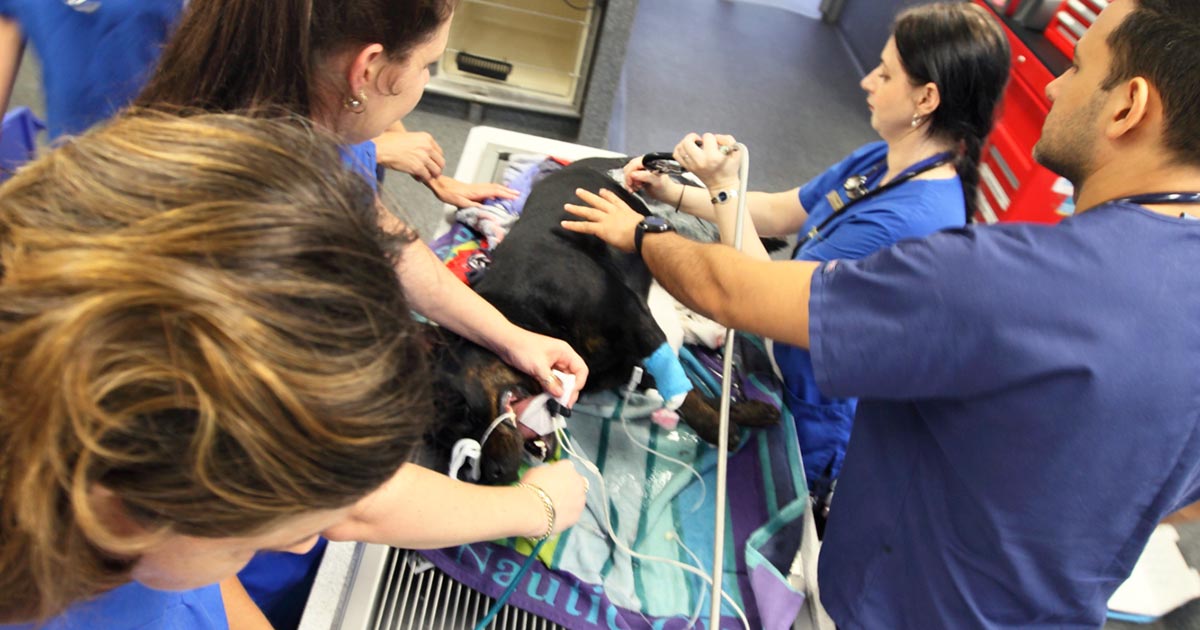
Dog bite wounds are one of the most common presentations in both general and emergency practice, and can often be challenging cases.
Once you have stabilised the patient, it is time to speak to the client. Here is when you need to address the most important point: the injuries they (and you) can see are just the tip of the iceberg.
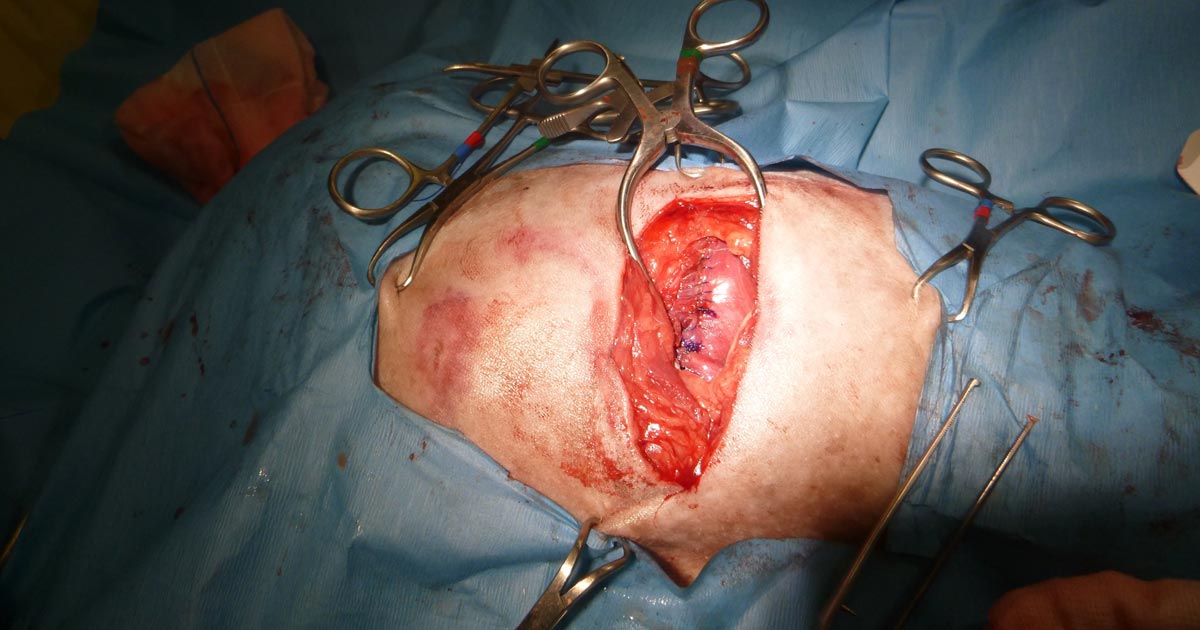
It can be helpful to draw pictures to let the owner know a small penetrative puncture wound can often be masking a horrific injury underneath. This is especially likely in cases where a big dog has attacked a small dog as the latter is often picked up and shaken around.
Recommendations
Here are some of my tips when managing a dog bite injury:
Ask the nurse to do a very large margin of clipping. When in doubt, clip a lot more than you think you’d need to.
Explore all wounds to their depths by dissecting the tissues until you are satisfied it does not lead any deeper or further.
“The solution to pollution is dilution.” Lavage as much as you can and remove all visible foreign material.
Perioperative antibiotics are always indicated.
Drains: try to reduce dead space with tacking sutures or by closing down the wound in layers. If unable to do so completely, drains may be used. Remember, the drain should exit next to the wound, not through it.
Pain control is very important for these patients. Poor pain control will affect healing and therefore overall outcome. Often multimodal pain control strategies are required – for example, a combined opioid and non-steroidal anti-inflammatory strategy.
Make sure you take proper photos before, during and after surgery – especially in cases where your patient’s owner might seek compensation from the owners of the aggressor dog.
Secondary survey refers to the detailed physical examination performed after the primary survey, and should only be performed once the patient has been adequately stabilised.
It is always important to perform physical examinations systematically to avoid overlooking organ systems. This could be difficult in a stressful emergency situation, so one way to remind yourself is with the following acronym:
thorax (do this at the same time as assessing the abdominal cavity):
ensure you do both left and right sides
chest tube site
pericardial site
wet/dry/third space
S – Spine and tail
gait and posture
pain sensation
crepitus
H – Head
mentation
cognitive function
cranial nerves
external wounds/bruising
eyes – including symmetry, third eyelids, eye position, haemorrhage and detailed ophthalmological examination
ears
nose
The secondary survey will help identify any concurrent problems not seen on the primary survey.
P – Pelvis
wounds
bruising
pain
cepitus
perineum
external genitalia
L – Limbs
deformities
fractures
pain
bruising
wounds
weight bearing vs non-weight bearing
A – Arteries
all accessible superficial arteries – pulses and pressure
N – Nerves
mentation
cranial nerves
conscious proprioception
postural reflexes
peripheral spinal reflexes
withdrawal reflexes
deep pain
cutaneous trunci reflex
anal tone
Stable patient
By following the primary and secondary triage processes consistently, you should be able to quickly determine the order of criticalness of patients, institute appropriate resuscitative measures and manage life-threatening injuries. Then, with your thorough physical examination, identify any other concurrent problems not seen on the primary survey.
Overall, you have a stable patient, and are able to formulate an appropriate diagnostic and treatment plan.
The art of triage takes time to master – particularly in emergency hospitals, where critical patients arrive in quick succession to the crash area.
Patients need to be examined quickly and effectively to ensure the most critical issues are identified and stabilised. To do this, I break triage into two categories – primary survey and secondary survey.
In part one I will discuss the primary survey process. The second part will go into the details of the secondary survey.
ABCDE approach
Primary survey refers to the initial stabilisation stage, where the aim is to preserve life, manage life-threatening injuries and re-establish tissue perfusion with oxygenated blood.
The approach to all deteriorating or critical patients is the same: ABCDE – Airway, Breathing, Circulation, Disability and External.
ABC – Airway, Breathing, Circulation
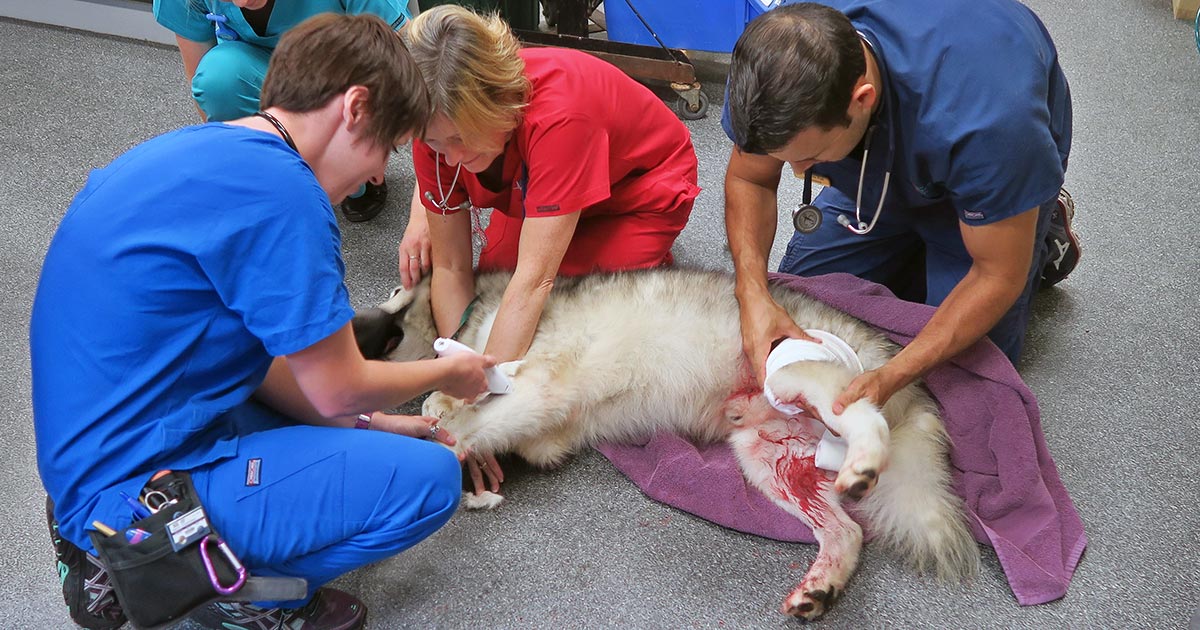
Critically ill patients need to be examined quickly and effectively.
Assess airway
Is it patent?
Does it require suctioning?
Does evidence exist of upper airway obstruction?
Intubate if you suspect the patient may need resuscitation.
If you suspect cardiopulmonary arrest, begin basic life support immediately. This involves chest compressions, and intubation and ventilation in:
loss of consciousness
absence of spontaneous ventilation
absence of heart sounds on auscultation
absence of palpable pulses
Assess breathing
Is the patient hyperventilating or hypoventilating?
How is the respiratory effort? Is it sustainable?
What is its oxygen saturation, or does the patient looks like it needs oxygen? If yes, provide supplemental oxygen therapy.
Does the patient need to be ventilated? Ventilation is required if any of these criteria are satisfied:
hypoxaemia (partial pressure of oxygen lower than 60mmHg or blood oxygen saturation level lower than 90%) and unresponsive to oxygen supplementation
hypercapnia or hypoventilation (partial pressure of carbon dioxiden greater than 60mmHg)
unsustainable respiratory effort?
Consider sedation. Reducing stress can make a dramatic difference in stabilising dyspnoeic patients. Butorphanol or low-dose acepromazine (try to rule out cardiac disease first) can be used in these situations.
Assess cardiovascular system
Mucous membrane colour, capillary refill time, heart rate and rhythm, pulse pressure, and temperature.
If a heart murmur or arrhythmia is present, I try to rule out cardiogenic shock before resuscitation therapy.
At the same time, draw enough blood to run baseline blood work and begin IV fluid resuscitation if signs of shock are present. Fluid boluses should be considered if any of these exist:
pale mucous membranes
slow capillary refill time
tachycardia
poor pulse pressures
hypothermia
I generally start with 10ml/kg Hartmann’s Solution over five minutes and reassess.
D – Disability assessment
Any abnormalities in:
Mentation? Seizures?
Level of consciousness?
Altered pain sensation?
E – External assessment
assessment for wounds or injuries
control any obvious bleeding, apply direct pressure – possibly tourniquets, but only for less than 30 minutes unless life-threatening bleeding
initial medications:
pain relief – generally opioids are safest with unstable patients
antiepileptics – diazepam
sedation for dyspnoeic patients – butorphanol or low-dose acepromazine IV
Once you have finished your primary survey and performed the required intervention, you repeat your primary survey until the patient is appropriately stabilised.
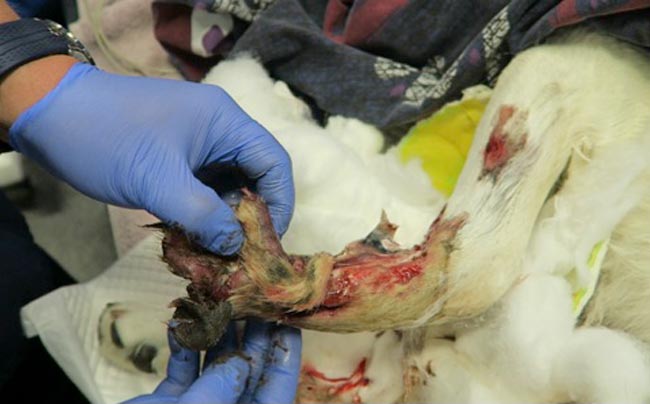
Casts and bandages are frequently used to treat orthopaedic conditions, especially in situations where clients have financial constraints that rule out surgical treatment.
Necrotic foot: a complication after inappropriate monitoring of a Robert Jones bandage (zoom).
However, these techniques have an extremely high probability of complications, including:
malunion, delayed or non-union
fracture disease – which refers to joint stiffness, muscle atrophy and disuse osteopenia associated with prolonged casting
And, most commonly:
soft tissue injury – ranging in severity from mild dermatitis or pressure sores to sepsis and avascular necrosis of tissues
Check and check again
Although avoidance of using coaptation techniques is recommended, very stringent case selection may help to reduce the risk of complications occurring.
If you do end up having to attempt external coaptation, the most important thing to do is to schedule very regular checks and re-application of the cast or bandage.
Get clients to monitor for:
any unusual smells coming from the bandage
changes in the way the patient walks, e.g. increase in lameness
discolouration of the bandage
any signs of pain or irritation
Always err on the side of caution and schedule the checks more frequently than you think you should, otherwise you could end up with a situation as seen in the image above.
When we polled young veterinarians about what their career concerns were, more than half of the respondents listed worrying about making mistakes as one of their biggest problems.
This is not surprising, and not altogether unwise, considering the myriad of things that can potentially go wrong. However, making decisions based primarily on trying to avoid stuffing up can have very negative effects on our working lives.
So, how can we think about mistakes in a better way?
Impairing growth
The anxiety that comes from a fear of making mistakes – that ever-present uneasy feeling of “what have I forgotten?” – is a big enough problem in itself, but a more insidious and possibly more damaging consequence exists that arises from an “error avoidance” based approach: you run the risk of not becoming the best possible version of yourself.
Avoiding all risk of failing by never undertaking anything challenging might protect you in the short term, but it also keeps you weak. To allow growth, you need to continuously push yourself – even when it puts you at risk of making mistakes.
To be sure, making mistakes will be painful, and our natural inclination is to avoid pain, but pain is a very good teacher. When you do make a mistake, you will think you’ve failed, but you only really fail if you give up. The pain will eventually go away, but the lessons will remain.
Feeling good
The flip side of pain is the pleasure of success. The rush of positive emotions you experience when you succeed at something hard creates positive feedback loops that will drive you to challenge yourself again and again. This will increase your general sense of self-worth and accelerate your professional growth. In the absence of this kind of stimulation, it is likely you will become bored and dissatisfied, and eventually stagnate.
While it’s easy to be philosophical about it, we need to be realistic about the fallout of actually making a mistake. Besides the immediate deleterious effects on the patient you are trying to help, we also worry about the effect on our future careers – not to mention the havoc this can play on our self-confidence.
We worry about losing the respect of our colleagues and peers. We want to feel and appear smart and capable – after all, most vets have a long history of success and achievement, so to suddenly be in a position where we’re faced with the embarrassment of failure is an uncomfortable new space to occupy.
So, how do we get past these fears? Well, for a start, you can get over the idea you are above making mistakes and that making errors is a sign of weakness or inferiority.
Forget about pretending you know everything. When you acknowledge to yourself and to others that you have room for improvement, you will make it easier on yourself and those around you. You don’t always need to be right. In fact, you almost certainly aren’t. And that’s okay.
This way, when you do mess up, it’s much easier to see it as an inevitable part of our profession and an opportunity for learning, rather than a personal failure. Reframe “mistakes” as “lessons” and take comfort in knowing that, if you are making mistakes, you are operating at the edge of your abilities – and it’s at that edge where the fastest growth will happen.
Ride bigger waves
Big wave surfer Shane Dorian once said that if he’s not regularly wiping out, it’s a sign that he’s not pushing himself enough, and that his surfing will suffer for it. Instead of sticking to the easily makeable waves at work, we need occasionally paddle for the ones that have the potential to give us a beating. It might be scary, but this is where you’ll get the ride of your life.
Instead of sticking to the easily makeable waves at work, we need occasionally paddle for the ones that have the potential to give us a beating. It might be scary, but this is where you’ll get the ride of your life.
Of course, you need to recognise which waves can hurt and which ones can kill. You also need to be fit and prepared, and know your limits – and if you end up in a big wipeout, you need to know how to get yourself out of trouble so you don’t actually drown.
In the next post we’ll look at some practical tips on how to best deal with the consequences of making mistakes.
Few companies now offer affordable point-of-care tests for canine C-reactive protein (CRP). As we did when we recently received our new box of CRP slides, you might soon be asking the question: what do we even do with this stuff?
Here’s what we’ve learnt…
CRP is one of the acute phase proteins produced by the liver in response to inflammation. Healthy patients have very low levels of CRP, but a systemic inflammatory condition will cause an increase in CRP within four to six hours. Conversely, increased levels will decrease rapidly on resolution of inflammation. This provides an almost real time measure of inflammation that is more responsive and reliable than the white blood cell response.
In other words, CRP can indicate the presence of inflammation before the patient’s white blood cell count gives any clues, or before it becomes pyrexic – and, unlike the white blood cell count, stress and steroids do not affect CRP levels.
Uses
So, how do we use it?
I love it for early pickups of problems in those grey area cases: the dog seems okay on clinical examination, but something about it bothers me. A normal or mildly increased CRP test will make me sleep more easy, while a surprise high reading will prompt me to admit for full diagnostics, or at least get the patient in for a follow-up CRP the next day. Conversely, a localised problem – such as an abscess – combined with a normal CRP test might mean you can hold off on antibiotics and just recheck CRP in 24 hours.
It’s great for monitoring response to treatment. If my plan is working then I’d expect CRP to show a significant decrease by day two or three. If it’s not dipping by then, I need to reassess my treatment plan. Do I need to change antibiotics? Scan it again? Maybe we need to consider surgery? It can also be a good prognosticator. Research has shown failure of CRP to decrease significantly (around a 3× decrease) by around day three is generally bad news for patients with inflammatory conditions such as pancreatitis and immune-mediated haemolytic anaemia.
We are starting to play with it for post-surgical monitoring. Any surgery will cause inflammation with an increase in CRP levels, but in an uncomplicated postoperative period, you should expect levels to start decreasing by day three to five. A base line CRP 24 hours after surgery with a recheck on day three should pick up early signs of postoperative problems such as infection, and prompt investigation or intervention.
A potentially nifty use for it that we haven’t yet had the opportunity to use is in differentiating inflammatory lamenesses (arthritis, infection, injury) from a neurological causes – that is, is it arthritis or a nerve problem?
Limitations
Remember, it’s very sensitive, so will increase with almost any inflammation. A mild upper respiratory infection or a bad gingivitis will likely induce some changes, so it’s important not to over-interpret (keep in mind that the magnitude of the increase in CRP does generally correspond with the severity of the inflammatory response). A pancreatitis case where the CRP fails to drop does not always mean death is looming – you may have just missed the concurrent skin disease. Always interpret CRP values in concert with your clinical examination.
Be aware that pregnancy and intense exercise can increase CRP values.
Not all serious conditions have an inflammatory component. CRP will be unchanged in most veterinary cases of heart disease; in common hormonal disease, such as adrenal disease and uncomplicated diabetes; urinary obstructions; many localised cancers; epilepsy and many others. Don’t presume that just because CRP is normal, everything is fine.
No similar test exists for cats.
Sit up and say…
My favourite way to explain how to use this test is by using its highly appropriate acronym – any unexpected increase should make you sit up and say: “Oh CR*P! What am I missing?”
As discussed in part one of this blog series, a myriad of disease processes can lead to ionised hypocalcaemia (iHCa).
Despite this, only hypocalcaemia caused by eclampsia and hypoparathyroidism (primary or iatrogenic – post-surgical parathyroidectomy) are severe enough to demand immediate parenteral calcium administration.
Hypoparathyroidism is quite rare, so this blog will not explore the detailed pathophysiology behind this syndrome. However, it is worthwhile mentioning – aside from primary hypoparathyroidism – no other disease state requires long-term calcium supplementation.
Eclampsia, on the other hand, is the most common cause of clinical hypocalcaemia in dogs and cats. Multiple factors can predispose animals to the development of this phenomenon, so understanding the pathophysiology behind this potentially fatal disease will not only help with future diagnosis and treatment, but also help prevent this issue.
Periparturient occurrence
Eclampsia – also known as puerperal tetany or periparturient hypocalcaemia – occurs in the periparturient period anywhere from the final few weeks of gestation to four weeks postpartum, with the latter being the more common time frame of manifestation.
The serum concentration of ionised calcium (iCa) is often less than 0.9mmol/L in bitches or less than 0.8mmol/L in queens. It presents as muscle fasciculation and tetany, but not usually in seizure since most patients maintain consciousness. Exceptions occur when these patients are left untreated – these patients may develop refractory seizures, cerebral oedema and death.
The increased muscle activity generates a lot of heat and uses a significant amount of glucose; therefore, hyperthermia and hypoglycaemia are common sequelae in patients with delayed presentations.
Reduced iCa
Eclampsia occurs as a result of reduced iCa in the extracellular compartment. In lactation-associated hypocalcaemia, it is the result of the body’s inability to maintain serum iCa through increased osteolytic activity and gastrointestinal calcium absorption, and reduced renal calcium excretion to compensate for the loss of calcium through milk production.
Other factors often predispose animals to developing eclampsia. These can include poor periparturient nutrition, excessive calcium supplementation and large litter size.
Excessive calcium supplementation in the prenatal period causes parathyroid gland atrophy, preventing parathyroid hormone release – resulting in reduced gastrointestinal calcium absorption and osteoclastic activity, and increased kidney calcium loss.
Clinical signs
Clinical signs can progress rapidly and become fatal if left untreated.
In the early phases, non-specific signs can present as:
facial pruritus
hyperaesthesia
panting
tremors
muscle fasciculations
paresis
ataxia
Within a few hours, these clinical signs rapidly progress to rigidity, and tonic and clonic spasms with opisthotonos. By this stage, animals will develop severe tachycardia, tachypnoea and hyperthermia. Without treatment, a high mortality rate exists.
Patients presenting with eclampsia require immediate medical intervention, as well as concurrent supportive therapy. The acute management of clinical iHCa is the same, regardless of the cause, and will be discussed in detail in part three.
Supportive therapies required to manage and prevent a patient relapsing in eclampsia often include active cooling and glucose supplementation. In cases that seizure, anti-seizure medications – such as diazepam and barbiturates – and mannitol for cerebral oedema may be required.
Prevention
Even before getting to the stage where an animal requires treatment, all effort must be taken to prevent a dam from developing hypocalcaemia. This can be easily achieved by improving the calcium content of the food during the perinatal period, as well as reducing the milk demand by early weaning kittens or puppies. This is likely particularly helpful for those with a history of eclampsia or with large litters.
From the second half of gestation, it is recommended a commercial formulation of puppy/kitten food (1% to 1.8% calcium and 0.8% to 1.6% phosphorus) is to be fed to the dam without any additional minerals or vitamin supplementation.
Postpartum calcium is similar to the second half of gestation, requiring a diet containing at least 1.4% calcium with a 1:1 ratio with phosphorus (most balanced growth formula for puppies and kittens).
Less demand
Early supplementation of puppies and kittens with commercial milk formula will significantly reduce the lactation demand on the dam. Together with this, starting at aged three to four weeks, solids can be introduced at this time. These techniques will be particularly helpful to those with a history of previous eclampsia or those with large litter sizes.
Aside from the parenteral calcium supplementation required, other supportive therapy – such as active cooling, IV fluid therapy and glucose supplementation – may be required.
Long term, the dam’s nutritional content of calcium must be optimal from the second half of gestation. All additional calcium or other vitamins and mineral supplementations should not occur prior to parturition.
In the postpartum dam with a history of eclampsia or that is at risk, changing to a nutritionally balanced commercial food aim for growing puppies and kittens is ideal. Early weaning – or abrupt weaning if hypocalcaemia is severe – may be required in severe cases or those with a high risk of relapse/development.
Prolonged hypoxaemia, hypotension and hypoventilation are the top three causes of periparturient fetal mortality – for these reasons, all precautions must be taken to avoid it.
As soon as authorisation has been obtained to proceed with a caesarean section, the patient should be stabilised immediately. This includes having perioperative blood work performed, and clinical hypoperfusion (common in patients that have gone through prolonged stage two labour) and hypotension corrected as soon as possible, usually with fluid boluses.
While fluid deficits are being corrected, preoperative monitoring and surgical site preparation (clipping and the initial stages of surgical scrub) can be performed with the patient still conscious. This will significantly reduce the time the patient is anaesthetised, as isoflurane potentiates hypotension.
Physiological changes
A few physiological changes in periparturient patients must be considered before anaesthetising them.
Higher oxygen demand
Firstly, pregnant animals have a higher oxygen demand due to the developing fetuses. However, due to their large gravid uteruses, they have decreased functional residual capacity and total lung volume. This is further exacerbated when animals are placed in dorsal recumbency, with increased pressure on their diaphragms.
For this reason, pregnant animals should always be preoxygenated prior to induction – with as much of the patient preparation completed – to reduce the risk of hypoxaemia. This is one of the main reasons the time from induction to delivery of the puppies should be as short as possible.
Sensitivity to anaesthetic agents
Secondly, pregnant animals have an increased sensitivity to anaesthetic agents. Blood volume and cardiac output also increase dramatically during pregnancy; therefore, if blood loss occurs and blood pressure is not maintained, significant hypotension can occur.
Any medication that crosses the blood-brain barrier will equally cross the placental barrier; therefore, the effect of medications can be reduced by a few things. Firstly, the use of local anaesthetics (such as epidurals) can be employed to minimise inhalation anaesthetics, thus their hypotensive effects. Always use minimal drug dosages that achieve the desired effect. Short-acting, rapidly metabolised drugs and reversible drugs should be used whenever possible.
Don’t premedicate
Premedication of caesarean patients is strictly avoided at our hospital. Acepromazine can result in hypotension and has a long duration of action, while opioids can cause potent respiratory depressants in unborn fetuses as it crosses the placenta.
Puppies and kittens born heavily narcotised or sedated will have bradycardia and may not take spontaneous breaths, further increasing the risk of mortality.
Once the patient has been induced, the speed of delivering the fetuses is of paramount importance. Inhalant anaeshetics causes maternal vasodilation and decreases uterine blood flow, as well as neonatal depression.
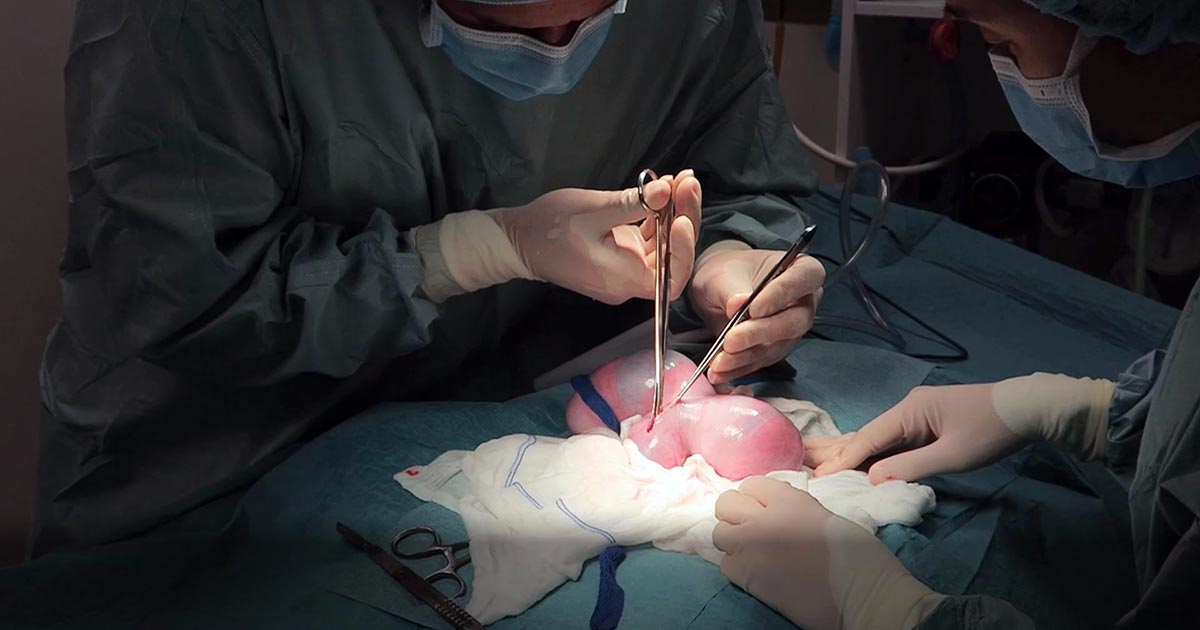
Making a large abdominal incision is highly advised, despite the fact it may take longer to close, as it enables faster and more gentle manipulation of a large fetus-filled uterus.
The traditional caesarean technique involves a single incision in the uterine body. Fetuses should be gently squeezed towards the incision. In patients with many fetuses, especially large-breed dogs, making a single uterine body incision may significantly delay delivery of the fetuses. Concern also exists with excessive traction and manipulation of uterine blood vessels when trying to manipulate the fetuses to the uterine body incision. In these cases, additional incisions in the uterine horns can be made.
With this method, surgical time for closure will be longer and considered carefully in patients where future breeding is likely, as the risks of adhesions and uterine rupture in subsequent pregnancies increases compared to the single uterine body incision method.
Closure of the uterine wall should always be in two layers – firstly, an appositional simple continuous pattern; followed by a second inverting (Cushing or Lembert) pattern.
Post-fetal removal
Once the fetuses have been removed, a few medications can be given safely intraoperatively.
Firstly, opioids are safe at this time. Fast analgesia can be achieved when the opioid is given IV. Oxytocin can also be administered during this time, but beware uterine involution and contraction will be immediate; therefore, close attention needs to be paid to the uterine sutures to ensure they have not become loose.
NSAIDs should be avoided in lactating queens and bitches, as most are excreted in the milk. Safety data has not been established in lactating animals, while previous animal studies have shown an adverse effect on the fetus.
Tramadol, a synthetic opiate-like (μ receptor) agonist, has high analgesic effects. Tramadol and its active metabolite are known to enter maternal milk, albeit at very low levels. No animal reproduction studies exist to establish its safety in use in neonates, but it is an analgesic considered safe to use in young animals.
Conclusion
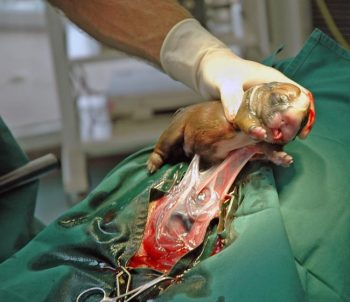
Caesarean section is the one emergency surgical procedure where speed is of essence.
With prompt stablisation, pre-induction surgical preparation, fast delivery of fetuses and avoidance of certain medications, the chances of survival of the already distressed fetuses can dramatically increase.
Now most female canine patients are spayed, it comes as no surprise reproductive emergencies are not as common.
One confusion seems to be not knowing how to determine a true dystocia emergency – especially when given advice over the telephone – from the process of normal parturition.
Another concern is how to confidently form a diagnostic pathway to determine the cause of dystocia – especially for reasons other than obvious physical abnormalities (for example, fetopelvic disparity and fetal malposition).
Often, once we decide to go down the medical treatment pathway – whether the result of findings or owner/financial constraint – no one is confident as to what medication should be used and how often drugs can be given safely.
This series of blogs will address these issues in a step-by-step manner. Hopefully, by the end, you will be confident in the diagnosis and management of dystocia.
Labour stages
Before moving on to the signs of dystocia, let’s go through the signs of labour.
First stage labour
First stage labour is characterised by panting, tremoring, nesting behaviour, a drop in core temperature – usually a drop by almost 1°C 24 hours prior to second stage labour – and a drop of progesterone to below 2mg/ml.
Second stage labour is landmarked by the water breaking, visible abdominal contractions, and the allantoic/amniotic sac or fetal parts visible from the vulva.
If vulval discharge is present, they should be clear. Excessive amount of bright red haemorrhage, green or black discharge prior to delivery, or purulent material can indicate a pathological process requiring immediate veterinary attention.
dogs: approximately 3 to 6 hours
cats: approximately 6 to 24 hours
Third stage labour
Third stage labour this is when passage of all the placenta has occurred, generally within 15 minutes after passing a puppy or kitten.
Clues
Now we understand the normal progression of parturition, a few clues exist in the history that could suggest dystocia may be present.
Some breeders will often know the ovulation timing of the patient – especially if AI was performed. Tests such as progesterone levels, luteal hormone (LH) levels, cytology and vaginoscopy are some ways where it can help time the ovulation.
The normal gestation length should not be any longer than 66 days from the LH surge or, if the ovulation history is unknown, 72 days from the last known breeding.
History of prior dystocia is a warning, as most animals with prior parturition difficulties are more likely to develop dystocia again.
The same goes for animals that have previously required a caesarean. Their risk of requiring future caesareans is high, with further risk of uterine rupture if dystocia happens again.
Owners often telephone after the failure of normal progression of delivery. The signs that always require immediate intervention are:
more than 4 hours have passed from the rupture of the first chorioallantois
more than 2 hours between delivery
more than 30 minutes of strong abdominal contraction and no delivery
presence of green or black discharge before delivery
large amount of bright red haemorrhage
abnormal amount of pain during contractions
collapse of the bitch or distracted mothering
Any of these signs require immediate presentation to the veterinarian. Delivery of stillborn puppies is also an indication where veterinary attention is indicated.
Finally, if owners are concerned, it is best to advise veterinary assessment rather than try to convince them everything is okay based on what they describe over the telephone.
Last week we covered diagnosing pancreatitis and the challenges associated with doing so. This week we look at management.
The treatment of pancreatitis largely involves supportive care and monitoring for potential complications. Here, we recap the fundamentals.
IV fluids
IV fluids are critical in the acute phase to restore perfusion to core organs and correct hydration deficits. Once achieved, the goal is then to cover maintenance requirements and ongoing losses.
Hypoproteinemia can develop due to a combination of haemodilution, increased losses in to inflammatory exudates or into gastrointestinal tract, and decreased production due to reduced intake.
Colloidal therapy or plasma can be considered, but enteral nutrition is more effective and has numerous other benefits.
Pain relief
Pain relief largely involves the use of opioids.
Pure opioid agonists, such as methadone, fentanyl constant rate infusions (CRIs) or fentanyl patches, are most commonly seen in dogs. In cats, partial agonists, such as buprenorphine, are favoured as the condition is generally less painful compared to dogs.
NSAIDs should be avoided due to concerns of poor perfusion, concurrent kidney and gastrointestinal involvement.
Antiemetic therapy
Metoclopromide CRI and maropitant are the mainstays. Antacids, such as esomeprozole, are included to help reduce the risk of gastric ulceration from stress.
Early enteral nutrition
Numerous studies have demonstrated the benefit of early enteral nutrition and patients should be encouraged to eat a low-fat diet as soon as possible. Enteral nutrition has been shown to be more beneficial than withholding food as it reduces recovery times and helps maintain enterocyte health.
If there has been a protracted period of anorexia then a nasogastric or nasoesophageal tube should be placed. A nasoesophageal tube has the added benefit of allowing excessive gastric secretions to be suctioned, as well as for feeding. Due the chronic nature of the disease in cats, oesophagostomy tubes are often placed so that nutritional support can be delivery for prolonged periods of time.
Antibiotics
Antibiotics are generally not indicated in canine pancreatitis unless markers of sepsis or if a septic exudate are found (this is an indication for exploratory surgery). In which case, triple antibiotic therapy consisting most commonly of amoxicillin, enrofloxacin and metronidazole are indicated.
It has been reported 35% of feline pancreatitis patients have bacterial infections; therefore, antibiotics are often included in the treatment of feline pancreatitis.
Exploratory laparotomy
This is indicated when the following has occurred:
Extra-hepatic biliary obstruction that does not resolve with medical management.
Septic abdomen (as mentioned above).
Pancreatic abscessation.
Prognosis
The prognosis for pancreatitis is variable and dependent on the severity of the disease.
In mild to moderate canine pancreatitis (which is the most common), the prognosis is generally good as they will normally respond well to supportive therapy and resolution of clinical signs occurs within several days of initiating treatment. However, with severe acute, necrotising pancreatitis, the prognosis is guarded as it can progress into systemic inflammatory response syndrome, disseminated intravascular coagulation and multiple organ failure – which has a high mortality rate.
The prognosis of acute feline pancreatitis is generally guarded due to the chronic nature of the disease and the propensity to involve multiple organ systems.