Tag: cytology

  • Trust, part 2: competence

    Trust, part 2: competence

    The previous post wrapped up with tips to help you build confidence, keeping in mind that we’re not focusing on confidence just for our own sake – we’re using confidence as a building block towards building trust with our clients.

    Remember, why would your clients trust you if you don’t trust yourself?

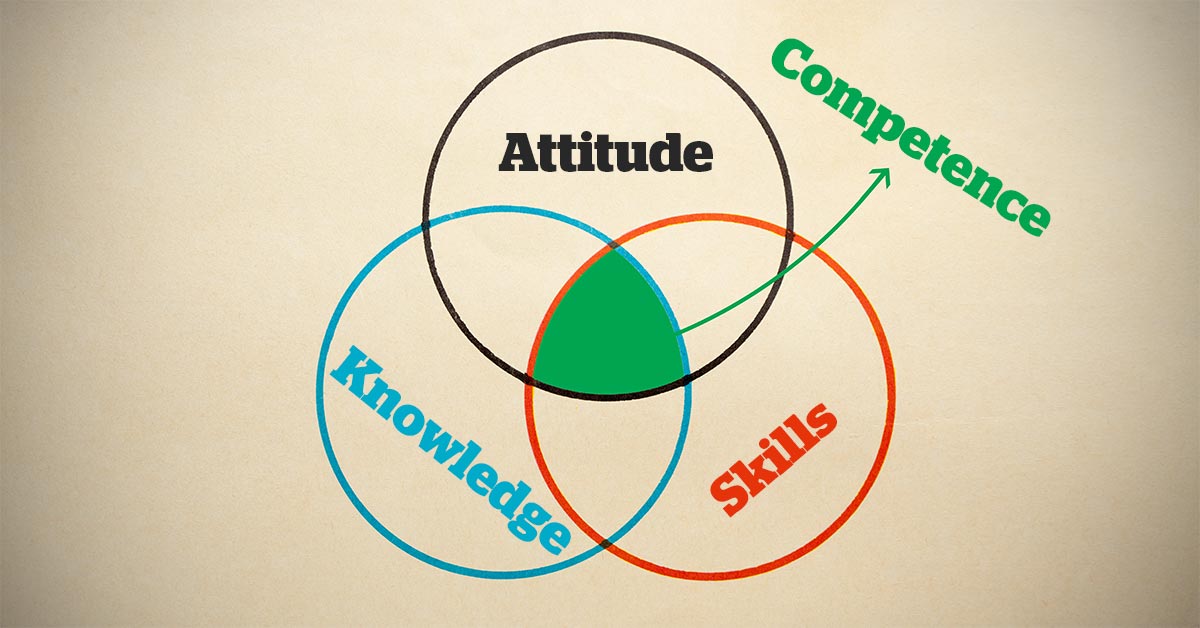
    The next trust-building tool is Competence. If you want someone to trust you with his or her pet, he or she needs to know that you know what you’re doing, right?

    But more exists to competence than simply showing that you know your stuff – it’s also about knowing that you know your stuff, which, of course, leads back to last week’s topic of confidence.

    Competence breeds confidence, which will make it easier for you to try new things and learn new skills, which, in turn, will lead to even more competence. More feedback loops…

    Here are some practical ways to use competence as a tool for perfect consults.

    Show competence

    Your clients want to know you are good at your job before fully trusting you.

    The problem is, they don’t get to see you shine once you leave the consult room, so you need to make sure you demonstrate competence in your dealings with them.

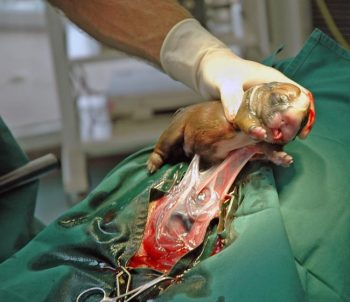
    This means making sure you know how the practice software works, know the vaccination protocols, how to confidently examine their pet, how to give an injection… the basics we mostly take for granted.

    If you appear to be a bumbling buffoon with the simple things, clients will presume you’ll be the same where it really matters.

    Talk about how competent you are

    Don’t be afraid to talk yourself up a bit. You can sell yourself – whether it’s your own skills, or your clinic’s – without being arrogant. For example:

    • “I have a special interest in skin cases, so I’m confident we can make a big difference here.”
    • “We see a lot of these cases, and we have high success rates.”
    • “Dr X, who will be doing the surgery, is one of the best in the business.”

    Develop competence

    It’s much easier to feel like your good at something when you are actually good at something.

    Resist the default of the aimless drift towards mediocrity – “Jack of all trades, but master of none.” Pick something – anything – and spend a bit of time polishing your skills in it. The manky ear, in-house cytology, behaviour, treating seizures, reading radiographs, dealing with angry clients, fixing canaries… anything.

    Distinguish yourself by becoming a “mini-specialist” in something, so that the next time one of those situations arises you absolutely smash it.

    Others will see this. Your clients will see it. People will acknowledge your skill and, maybe, praise you. Someone less skilled may start deferring to you the next time they have a similar case.

    These things will light up all those feel-good social centres that our minds have evolved for, which will give you a massive confidence boost. Which, as we just said… have I mentioned feedback loops?

    • The next part look at the final C needed to establish trust with your clients.
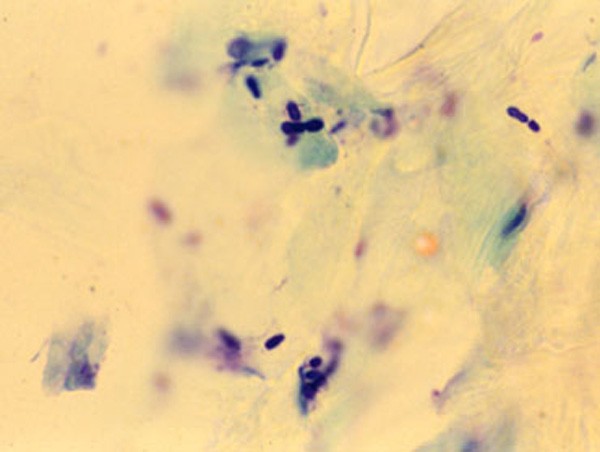
  • Dystocia, pt 1: labour stages

    Dystocia, pt 1: labour stages

    Now most female canine patients are spayed, it comes as no surprise reproductive emergencies are not as common.

    One confusion seems to be not knowing how to determine a true dystocia emergency – especially when given advice over the telephone – from the process of normal parturition.

    Another concern is how to confidently form a diagnostic pathway to determine the cause of dystocia – especially for reasons other than obvious physical abnormalities (for example, fetopelvic disparity and fetal malposition).

    Often, once we decide to go down the medical treatment pathway – whether the result of findings or owner/financial constraint – no one is confident as to what medication should be used and how often drugs can be given safely.

    This series of blogs will address these issues in a step-by-step manner. Hopefully, by the end, you will be confident in the diagnosis and management of dystocia.

    Labour stages

    Before moving on to the signs of dystocia, let’s go through the signs of labour.

    First stage labour

    First stage labour is characterised by panting, tremoring, nesting behaviour, a drop in core temperature – usually a drop by almost 1°C 24 hours prior to second stage labour – and a drop of progesterone to below 2mg/ml.

    Dog and puppy.
    Third stage labour occurs generally within 15 minutes after passing a puppy or kitten. Image © foto ARts / Adobe Stock
    • dogs: approximately 6 to 12 hours
    • cats: approximately 6 to 24 hours

    Second stage labour

    Second stage labour is landmarked by the water breaking, visible abdominal contractions, and the allantoic/amniotic sac or fetal parts visible from the vulva.

    If vulval discharge is present, they should be clear. Excessive amount of bright red haemorrhage, green or black discharge prior to delivery, or purulent material can indicate a pathological process requiring immediate veterinary attention.

    • dogs: approximately 3 to 6 hours
    • cats: approximately 6 to 24 hours

    Third stage labour

    Third stage labour this is when passage of all the placenta has occurred, generally within 15 minutes after passing a puppy or kitten.

    Clues

    Now we understand the normal progression of parturition, a few clues exist in the history that could suggest dystocia may be present.

    Some breeders will often know the ovulation timing of the patient – especially if AI was performed. Tests such as progesterone levels, luteal hormone (LH) levels, cytology and vaginoscopy are some ways where it can help time the ovulation.

    The normal gestation length should not be any longer than 66 days from the LH surge or, if the ovulation history is unknown, 72 days from the last known breeding.

    History of prior dystocia is a warning, as most animals with prior parturition difficulties are more likely to develop dystocia again.

    The same goes for animals that have previously required a caesarean. Their risk of requiring future caesareans is high, with further risk of uterine rupture if dystocia happens again.

    Image © Pilipipa / Adobe Stock
    Animals that have previously had a caesarean are at high risk of requiring future caesareans, with further risk of uterine rupture if dystocia happens again. Image © Pilipipa / Adobe Stock

    Intervention signs

    Owners often telephone after the failure of normal progression of delivery. The signs that always require immediate intervention are:

    • more than 4 hours have passed from the rupture of the first chorioallantois
    • more than 2 hours between delivery
    • more than 30 minutes of strong abdominal contraction and no delivery
    • presence of green or black discharge before delivery
    • large amount of bright red haemorrhage
    • abnormal amount of pain during contractions
    • collapse of the bitch or distracted mothering

    Any of these signs require immediate presentation to the veterinarian. Delivery of stillborn puppies is also an indication where veterinary attention is indicated.

    Finally, if owners are concerned, it is best to advise veterinary assessment rather than try to convince them everything is okay based on what they describe over the telephone.

  • Thoracentesis, part 2: sample work

    Thoracentesis, part 2: sample work

    Last week we gave some hints and tips about how to perform a thoracocentesis. This week we look at what to do with the sample you collected and where to go to next.

    Looking at the sample is not enough, there are several things you need to do to make sure you are getting the most information from the collected sample. This includes:

    • Fluid cell counts
    • Total protein assessment
    • Packed cell volume
    • Glucose
    • Lactate (if it is an exudate)
    • In-house cytology
    • Collect a sample for culture and sensitivity, and also external cytology assessment

    With this information you can narrow down your list of differentials; often enough it can give you a diagnosis.

    Here is the list I use. Note, it is not exhaustive and assumes you have taken three-view thoracic radiographs as part of the initial diagnosis.

    Transudate

    • Haemorrhagic effusion.
      Haemorrhagic effusion.

      Clear appearance – characterised by low protein and low cellularity

    • Transudates are caused by reduced oncotic pressure
    • Total nucleated cell counts = <0.5x10e9/L
    • Total protein = <25g/L

    Differentials to consider

    • Liver disease
    • Protein-losing nephropathy
    • Protein-losing enteropathy

    Additional diagnostics

    • Cytology and culture of fluid
    • Haematology and biochemistry
    • +/- dynamic liver testing
    • Urinalysis, urine protein/creatinine ratio, culture and sensitivity

    Modified transudate

    • Yellow/serosanguinous/cloudy appearance
    • Caused by increased hydrostatic pressure leading to passive leakage of proteins and fluid into the pleural space
    • Total nucleated cell counts = 3.5-5x10e9/L
    • Total protein = variable, ~25-50g/L

    Differentials to consider

    • Increased capillary hydrostatic pressure and pericardial disease
    • Diaphragmatic hernia
    • Neoplasia
    • Lymphatic obstruction, such as neoplasia, diaphragmatic hernia and abscess
    • Increased permeability of vessels (blood and lymphatics), such as FIP

    Additional diagnostics

    • Cytology and culture of fluid
    • Haematology and biochemistry
    • Cardiac auscultation and ultrasound
    • +/- CT

    Exudate

    • Turbid appearance – Very proteinaceous liquid, froths when shaken
    • Fluid is a mix of plasma and inflammatory mediators, and is caused by either septic or aseptic inflammation
    • Total nucleated cell counts = >3.0x10e9/L
    • Total protein = >30g/L

    Aseptic exudate

    • Non-degenerate neutrophils and activated mesothelial cells predominate
    • Non-infectious cause

    Differentials

    • Inflammation: FIP (can have high globulins), liver disease, lung torsion and hernia
    • Neoplasia

    Additional diagnostics

    • Haematology and biochemistry
    • Cytology and culture of fluid
    • +/- ultrasound/CT
    • Further testing for FIP

    Septic exudate

    • Degenerate neutrophils predominate: nuclear swelling and pale staining
    • Intracellular or extracelluar microorganisms
    • Culture and sensitivity: aerobic and anaerobic
    • Pleural fluid [glucose] < serum [glucose]
    • Pleural fluid [lactate] > serum [lactate]

    Differentials to consider

    • Ruptured abscess
    • Foreign body inhalation or penetrating injury
    • Fungal infection

    Additional diagnostics

    • Haematology and biochemistry
    • Cytology and culture of fluid
    • +/- ultrasound/CT

    Chyle

    Thoracocentesis-Chyle
    Chyle.

    Opaque (milky) to pink.

    Differentials to consider

    • Rupture or obstruction of lymphatic flow
    • Neoplasia, traumatic and idiopathic
    • Secondary to heart failure (especially in cats)
    • Pseudochyle (usually formed by lymphoma)

    Additional diagnostics

    • CBC and biochemistry
    • Cytology and culture of fluid
    • Fluid [TAG] > serum
    • Large number of lymphocytes and other inflammatory cells
    • +/- ultrasound/CT

    Haemorrhage

    • Red blood cells
    • True haemorrhagic; for example, not iatrogenic: should not see platelets or erythophagocytosis on smears and sample should not clot
    • Time frame
    • Assess history
    • Compare fluid PCV/total protein (TP) to peripheral PCV/TP:
    1. <1% – non-significant
    2. 1% to 20% – neoplasia, trauma, pneumonia
    3. >50% – haemothorax
    • Other tips:
    1. If PCV/TP is similar = recent bleed, if PCV is low and TP normal = chronic
    2. If PCV is increasing or is higher than peripheral then active bleeding
    3. Presence of erythrophagocytosis = chronic

    Differentials to Consider

    • Trauma
    • Neoplasia
    • Coagulopathies
    • Ruptured granuloma

    Diagnostics

    • Activated clotting time, activated partial thromboplastin time, prothrombin time, blood smear and other coagulation tests, see “coagulopathy”
    • Blood smear
    • CBC and biochemistry
    • +/- ultrasound/CT

    Good luck with your next thoracocentesis. I hope this information was useful.

  • Thoracentesis, part 1: indications, equipment and protocol

    Thoracentesis, part 1: indications, equipment and protocol

    Thoracentesis is a relatively straightforward and life-saving technique for seriously dyspnoeic animals with pleural space disease, and is a valuable diagnostic tool.

    Here are my tips for getting the most out of your approach to performing a thoracentesis.

    Indications

    • Therapeutic – relieve respiratory distress caused by pleural effusions and pneumothorax.
    • Diagnostics – cytological examination of pleural effusions will refine your differentials list and dictate subsequent management.

    Equipment required

    In addition to general equipment for clipping and prepping of the surgical site, the following tools are required to perform thoracentesis:

    • oxygen and mask
    • 20ml to 60ml syringe
    • 16G to 21G butterfly needle
    • three-way tap
    • extension set
    • ethylenediaminetetraacetic acid tubes (for cell counts)
    • sterile collection tubes (for culture and cytology)
    • fluid collection bowl (non-sterile collection)
    • +/- lidocaine 1mg/kg to 2mg/kg for centesis site

    Protocol

    1. Patient comfort

    Thoracocentesiscombined
    An approach to performing a thoracentesis.

    a. Options include local anaesthetic infiltration of the intended centesis site, and/or IM or IV opioid pain relief at standard doses.

    b. Opioid pain relief, such as butorphanol, is great for sedation that facilitates the process.

    c. Depending on the case, I often use opioid pain relief without local. This is sufficient in the vast majority of cases.

    d. If severely dyspnoeic, anaesthesia and intubation can help facilitate the process. It will reduce patient stress, enable manual ventilation and administration of 100% oxygen, and allow for larger volumes of air/fluid to be removed.

    2. Patient positioning

    Generally, sternal is easiest – otherwise, lateral recumbency or standing (if the animal will tolerate it).

    3. Site

    a. Locate the seventh to ninth intercostal spaces.

    b. To remove air, clip the dorsal two-thirds of the chest.

    c. To remove fluid, clip the ventral two-thirds of the chest.

    d. Clip a larger area than you expect.

    e. Prepare the area for an aseptic procedure.

    4. Connect everything

    a. The syringe to the three-tap and extension set should be ready prior to connecting the butterfly catheter.

    b. Often, a rush occurs to connect everything after the catheter is in place.

    5. Needle insertion

    a. Insert the needle on the cranial edge of the rib to avoid the nerves and blood vessels that run along the back of the rib.

    b. Ultrasound guided is best for fluid; you can lube the inside of a sterile glove and put the probe inside the glove to keep the area sterile.

    c. An IV catheter can also be used. I partially fenestrate a 20g IV catheter with two extra holes – once the catheter is advanced into the chest minimal risk exists of trauma to the lungs, and larger volumes of fluid and air can be removed.

    6. After insertion

    a. Once through the skin, connect to the extension set and apply gentle negative pressure. This can help determine how far you need to advance the needle into the chest.

    b. Sometimes a small syringe, such as 10ml, is better for smaller volumes as it creates less negative pressure. Pulse the negative pressure.

    7. Collect samples

    Make sure you collect the required samples from the first collection, as this is often the best sample and means you don’t forget.

    Overall, if you feel it is necessary to perform an emergency thoracentesis then do not delay. Most animals will tolerate the procedure well and have immediate dramatic improvements in respiratory rate, effort and oxygen saturations – all great outcomes for any dyspnoeic patient.

    Next week, we will look at what to do with the collected sample.

  • Under the microscope: lessons from pathology rotation

    Under the microscope: lessons from pathology rotation

    The past couple of weeks on rotation have largely consisted of looking down a microscope or performing postmortems – and despite clinical and anatomic pathology being very different, a running theme seemed to exist across both.

    microscope
    Image ©iStock.com/The-Tor

    On the clinical pathology week, we pored over slide after slide of blood smears and cytology samples, trying to formulate differentials from minimal or no history about the case.

    We muddled through a number of biochemistry profiles and attempted interpretation, often with little or nothing to go on from the submitting clinician.

    Historical significance

    In anatomic pathology, we were often supplied with the history, but the clinicians would not reveal the full extent until after we had formed differential lists – even then the “full” history we were given before proceeding with postmortem examination would often be scarce.

    Although we would often get there in the end, or at least in the right ballpark, I think it’s safe to say the importance of a relevant history has been drummed into us for evermore.

    Going forward as new graduates – far sooner than many of us would like – I don’t think we’d dare send a sample to the university lab without filling the forms out meticulously and providing a relevant history. Making an accurate interpretation that fit the clinical picture was so much easier when a few, seemingly minor points were highlighted in the history.

    The write stuff

    Another lesson creeping into every rotation over the year is the sheer amount of paperwork involved in veterinary medicine – be it clinical notes, postmortem reports, lab submission forms, case reports, anaesthetic records… the list goes on.

    Keeping accurate records can be the difference between being sued and being able to prove your clinical judgement at the time. Most relevant to this rotation was accurate completion of lab submission forms, so samples can be correctly identified and results sent to the right place.

    forms
    Accurate completion of lab submission forms is essential. Image © gamjai / Fotolia.

    It sounds obvious, but the clinical pathology staff assure us the frequency of receiving samples with important information omitted is much higher than you’d think.

    Out of practice

    Having explored the different aspects of clinical and anatomic pathology, while dragging a lot of material from the depths of third-year knowledge, I can appreciate how quickly some skills and understanding can be lost when you don’t practise or use them regularly.

    Feeling considerably rusty at the beginning of the rotation, I feel a lot more comfortable now, but can see how vets can lose their ability or confidence to make a cytological diagnosis when in practice, especially when things get busy.

    Being able to send samples to the experts is a major advantage, but I think, as new grads, we should at least have a quick look down the microscope and make a provisional call to be confirmed by the lab, rather than just sending samples straight off.

  • Needle aspirate subcutaneous masses

    Cytology of a mast cell tumor from a Labrador retriever at a magnification of 1,000x. By Joel Mills (Own work) [GFDL (http://www.gnu.org/copyleft/fdl.html), CC-BY-SA-3.0 (http://creativecommons.org/licenses/by-sa/3.0/) or CC-BY-SA-2.5-2.0-1.0 (http://creativecommons.org/licenses/by-sa/2.5-2.0-1.0)], via Wikimedia Commons.
    Cytology of a mast cell tumor from a Labrador retriever at a magnification of 1,000x. Image by Joel Mills [GFDL, CC-BY-SA-3.0 or CC-BY-SA-2.5-2.0-1.0], via Wikimedia Commons.
    Fine needle aspiration (FNA) is a valuable tool in subcutaneous skin masses.

    We have all had those lumps that, on palpation, you are sure are lipomas (being soft, freely mobile and slow growing). Indeed, the vast majority are just such benign problems – however, it is worth aspirating them to be sure.

    Felt like lipoma

    We recently had a case in a nine-year-old Labrador with a soft subcutaneous mass the owner had been aware of for a month. It felt just like a lipoma.

    On checking the lump again two weeks later, this had got noticeably bigger. FNAs of the mass revealed the presence of a mast cell tumour.

    Following excision with good 3cm margins, the Lab went on to make a full recovery.

  • Don’t forget cytology and Malassezia dermatitis

    Don’t forget cytology and Malassezia dermatitis

    Tape cytology from dog with Malassezia dermatitis (Dif-Quik stain).
    Tape cytology from dog with Malassezia dermatitis (Dif-Quik stain) – note the “peanut-shaped guys”. Image: Wikimedia Commons

    Ever had one of those cases, which seem to typically occur around this time of year, that you think must be the start of an allergic dermatitis?

    These present with pruritus, erythema and sometimes a yellowish/grey, greasy feel to the skin and hair coat.

    The dog is already on a regular POM-V broad-spectrum antiparasiticide.

    Initial thoughts

    Pyoderma immediately springs to mind – it’s 6.55pm on a Friday, you skip the cytology and start on an appropriate antibiotic; maybe even a short course of prednisolone.

    A week later and the dog has not really improved, so it’s a great time for some cytology. There is a good chance we have got a Malassezia dermatitis, and hey presto – the peanut-shaped guys are visible on microscopy. A couple of Malaseb shampoos later and we are rocking.

    Then the fun really starts as we try to determine the underlying cause…

  • Quick cytology preps for assessing skin microbial flora

    Purple stain
    Does full immersion make your tape strips hard to examine? Image ©iStock.com/BanksPhotos

    One of the pleasures of having completed my dermatology certificate is that I get to peer down a microscope at cytology preps a fair amount.

    Now, if you’re anything like me, you’ll have become frustrated with Diff-Quik preps (particularly if you are using tape strips and all three solutions) as the strip becomes soggy and opaque, making it hard to examine.

    A handy tip I learned from a specialist dermatologist working in the States was to just use the blue/purple stain, pop a drop onto a slide and then stick your strip over the liquid and slide. Leave this a few minutes and examine as usual.

    This is quick and allows easy identification of cocci and yeast microorganisms under the microscope.

    However if it’s cells you’re interested in – in, say, suspected cases of pustular disease – I’d suggest you still go through the full staining process.

  • When is a lipoma not a lipoma?

    Fine-needle aspiration (FNA).
    Fine-needle aspiration (FNA) of a mass. Image source: BSAVA ’09 Congress Times.

    We recently had a case where a freely mobile, soft mass on the ventral abdomen, which had been present for a number of years, had started to get larger.

    We carried out a fine-needle aspiration (FNA) biopsy, and I fully expected this to confirm the presence of a lipoma (a benign fatty tumour common in dogs).

    However, I was really surprised when the cytology revealed the presence of a mast cell tumour, with a surgical procedure to follow.

    My tip would be that it is definitely worthwhile checking out those seemingly innocuous “lipomas” with FNAs.

  • Using cytology to check for Malassezia organisms

    Using cytology to check for Malassezia organisms

    Fed up with your tape going all soggy?
    Fed up with your tape going all soggy?

    If, like me, you get frustrated using scotch tape in the Diff-Quik to check for Malassezia, I recently came up with a tip to avoid the tape going all soggy and cloudy in the fixative solution prior to staining.

    Take the strip as normal, but stick it directly onto a microscope slide. Then, using a 1ml syringe, collect a small amount of the final purple stain and inject it directly under the tape. Leave for a few minutes and then examine under oil immersion as normal.

    In my experience, this works just as well as the usual process.