Gastric dilatation-volvulus (GDV) is a true veterinary emergency and while it can be daunting to be presented with a sick dog with suspected GDV, the most important thing to remember is this patient will likely succumb to this condition without your intervention.
First, a little pathophysiology: GDV is a broad term that can refer to gastric dilation on its own, gastric dilation with volvulus, and even chronic gastric volvulus. These conditions usually present in large or giant breeds and we still know little about the underlying causes.
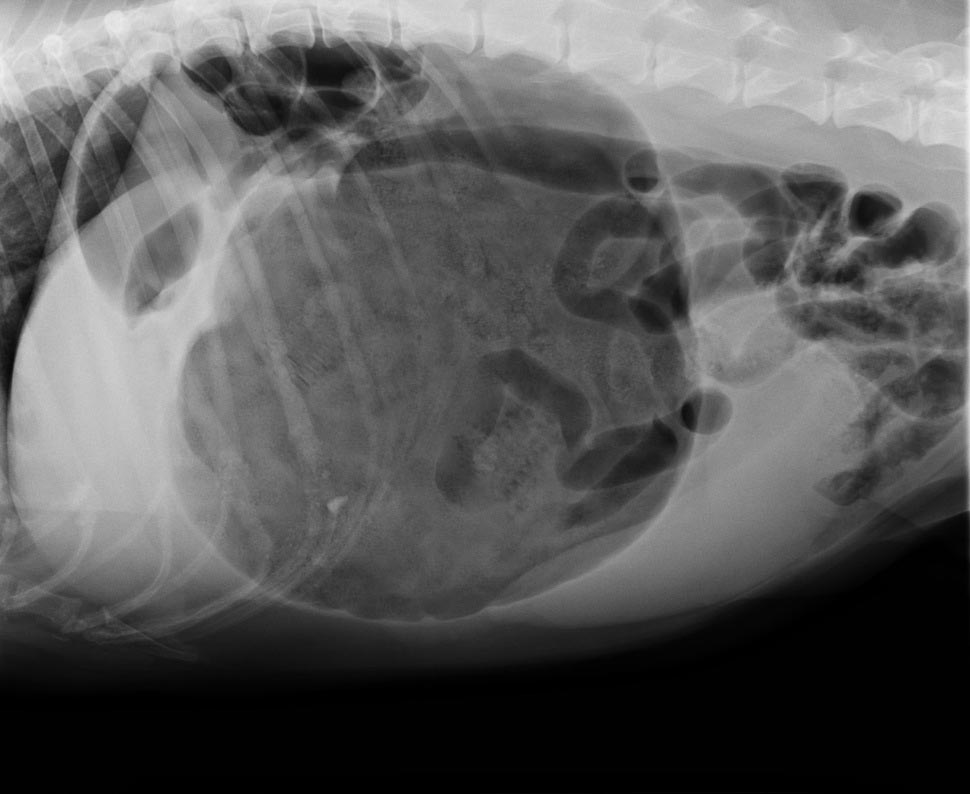
Gastric dilatation-volvulus (click to zoom).
Once dilation and volvulus occurs, perfusion to the stomach and other abdominal organs is compromised. Along with general shock – which can be fatal in its own right – decreased stomach wall perfusion can result in stomach wall necrosis, rupture and peritonitis.
Clinical signs
Quite often, a GDV case starts with a telephone call from a panicking owner. He or she usually reports an acute onset of retching, regurgitation or vomiting in their large or giant breed dog after feeding.
Other common signs include:
hypersalivation
agitation
palpable abdominal distension
When presented, many of these cases will be obvious and the animal already in some degree of shock. You need to institute fluid resuscitation and gastric decompression immediately to restore perfusion as soon as possible.
Confirmation
To confirm the patient truly has GDV, as some patients may present with simple gastric dilation from over-engorgement, you need to perform an abdominal radiograph.
Always keep an eye out for the large, deep-chested dog that presents with vomiting or retching, but doesn’t appear bloated. Don’t be fooled into ruling out GDV in these patients based on physical examination alone – often, no visible or palpable gastric distension exists as the ribs cover the stomach. That is where the abdominal radiographs play an especially important role.
It is common practice at our hospital to perform abdominal radiographs as soon as possible, so as to not miss a hidden or subtle GDV in these large breed dogs.
Which view is best?
The classic approach is to lie the patient in right-lateral recumbency, in this view, you would see the classic “Smurf’s hat”, “boxing glove”, “Popeye’s arm”, “double bubble”, etc. This is compartmentalisation of the stomach, indicating not only gastric dilatation, but volvulus as well.
You should also look for evidence of pneumoperitoneum, as it may suggest gastric wall rupture.
At this stage, it is also important to collect blood for biochemistry, haematology, electrolytes and, if available to you, blood gas analysis. ECG readings should also be taken to determine if the patient has any life-threatening arrhythmias, such as ventricular tachycardia.
Next month, we will talk about stabilising and treating these patients.
Every vet has their niche, speciality or personal interest. I think I’m slowly finding that mine may be located somewhere in the gastrointestinal (GI) system; as the daughter of an endoscopy nurse I like to think I’m following in the family footsteps.
I was really enjoying my lectures on the topic until we reached the point of hiatal hernias.
The unfortunate cognitive dissonance of veterinary medicine is that the more interesting or objectively “cooler” the case, the more likely it is often incredibly sad from the perspective of the patient.
Vet geek
In this case, I personally was finding the concept of a sliding hernia pretty “cool” (don’t judge, I’ve been out of the game for a year and I’ve missed nerding out over-vetty stuff), until I learned that the majority of brachycephalic dogs suffer from the condition.
The mechanism behind this being that, in an effort to breathe through an actively collapsing airway, a brachycephalic dog can effectively create such a negative pressure that it sucks its stomach through its diaphragm and into its thorax.
The worst part of this is that it’s suspected the majority of cases are subclinical (or, at least, subclinical to the owner), as the main clinical signs associated with nausea, such as drooling and lip smacking, are characteristic of short-nosed breeds anyway.
Less love?
I wonder if a pilot finds it impossible to enjoy a flight? Even if you stuck him in first class with a martini, the Friends box set, comfy slippers and a sirloin steak on the menu, would he be able to switch off, or would he find his mind focusing on minute turbulence? Would he keep checking the altitude, or picturing the cockpit, wondering: “What on Earth is going on up there?”
Along a similar vein, by the time I finish vet school I wonder if I will ever be able to truly enjoy a dog in the way I used to? If somebody had presented me with the fluffiest, most adorably friendly puppy in the world the day before I’d started first year, I’d have been ecstatic – I may even have passed out from happiness.
Not just a puppy
Now, don’t get me wrong, I’m never NOT going to love being handed a puppy, but it’s not just a puppy anymore.
Has it been vaccinated?
Was its mother healthy?
Did the breeder socialise it effectively, or will it forever have a fear of bearded men in funny hats?
Is there a cleft palate behind those tiny teeth?
Are there worms lurking in that adorable pot belly?
It’s like my subconscious races to take a history in every animal – even if they’re not a patient!
Natural versus artificial selection
As a constant reminder of my disturbing lecture notes, while tutoring GCSE biology I regularly cover the topic of “natural versus artificial selection” with my students. This includes covering the staggering feet of man’s journey over the past 1,000 years to convert the wolf into anything from a small bear to something that fits in a handbag.
Each time I teach this topic I find myself fighting the urge to be overly pious, knowing no exam will ever ask them to list the ways the pug is destined to a snorting existence or why the dachshund can’t jump onto his owner’s lap for fear of shattering his spine.
I feel including that sort of thing in the syllabus could certainly go a long way – and perhaps the best way to promote healthy dogs is with re-education from the ground up. But is that my responsibility? More importantly, is it the responsibility of vets in general?
Flawed from birth
With some owners (especially breeders), mentioning any predispositions or hereditary conditions of their dog is akin to attacking their personal brand.
Some people are “dog people”, while some are very passionately and unequivocally only “pug people” or “sausage dog people” or “golden people” – and it’s generally a struggle not to cause offense when telling an owner their animal is slightly overweight, let alone that their pride and joy is genetically predisposed to be flawed from birth.
The frustrating thing is that if owners knew the risks to their particular pup then prophylactic management could really make a difference to these animals’ lives.
Not walking brachycephalic breeds on hot days, keeping the weight off of larger dogs to take the stress off of their joints – prevention is always better than cure, and if we can’t prevent the breeding and purchasing of puppies with a gene pool so shallow only a gnat could drown in it then at the very least we should be aiming to prevent suffering and promoting comfort.
Balancing act
The danger, as always, is that if you tell an owner what they don’t want to hear too many times, they won’t come back. So, the balancing act lies in maintaining the client-vet relationship so as to ensure animal welfare, while not being too pious or condescending.
This is equally important in day-to-day life. Being able to switch off is a must for any professional to maintain mental health, yet it’s sometimes hard to stay quiet when your friend mentions their aspiration to own 50 sausage dogs.
My question for you is, does a vet ever stop being a vet, and is a dog ever really just “a dog”?
Obstructive feline lower urinary tract disease (FLUTD) is a common presentation in both general practice and emergency settings.
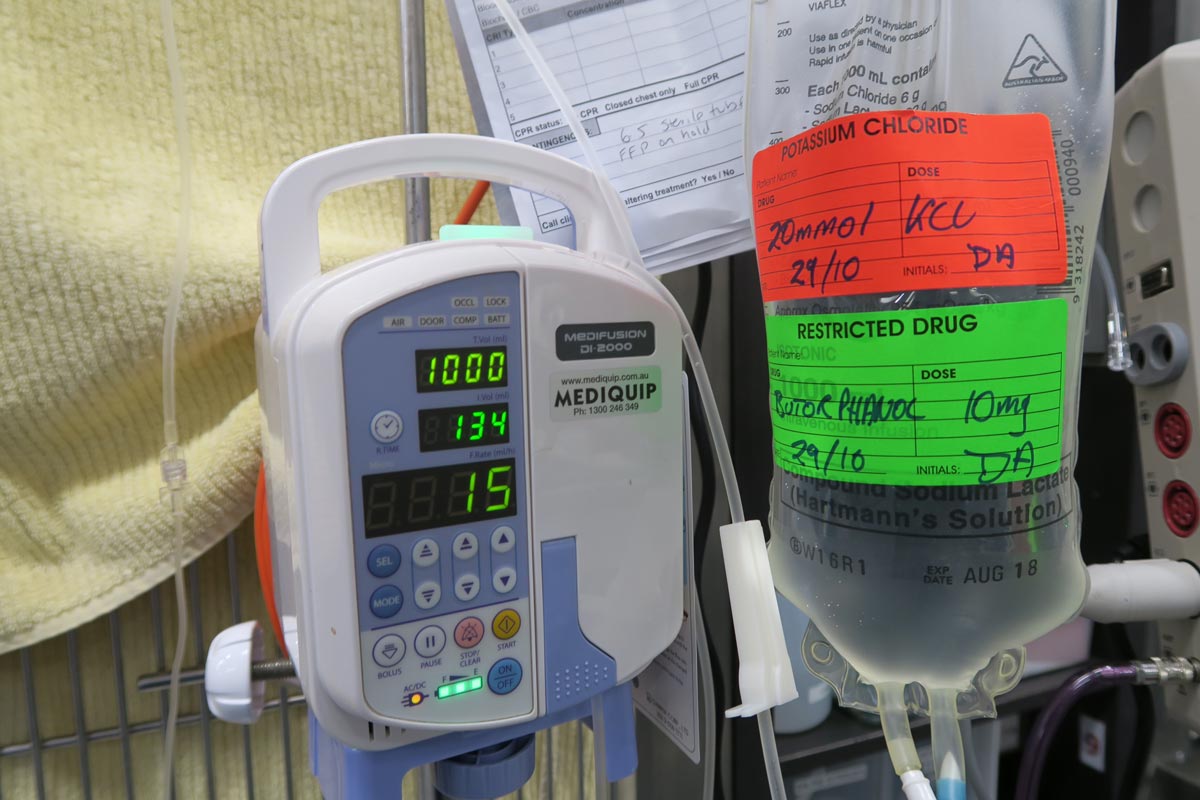
Every clinician has his or her own approach to treating and managing a cat with obstructive FLUTD signs. Working in an emergency setting, once I have confirmed an obstructed bladder via palpation, I focus on trying to relieve the obstruction as quickly as possible.
The first step is obtaining consent from the client to administer pain relief (an opioid IV or IM), place an IV catheter, collect blood for biochemistry, electrolyte and blood gas analysis, and temporarily relieve the obstruction.
At our hospital, we achieve temporary relief of the obstruction generally within 15 minutes of patient arrival.
Process
Obstructive feline lower urinary tract disease is a common presentation in general practice.
We do this in three steps:
Assess the tip of the penis, occasionally a crystal/mucus plug is all that is blocking the penis.
If this is not the case, I pass a pre-lubricated 22g IV catheter tip (without the stylet) into the penis with a 10ml syringe, containing 0.9% NaCl, connected for hydropropulsion. In the vast majority of cases, this helps to dislodge the urethral blockage enough to enable some urine to pass (urination suggests active urination by the cat).
Once urine is flowing, I pass a 12cm or 14cm rigid catheter, tape it to the tail and leave it in place to allow constant drainage.
If the 22g IV catheter does not relieve the obstruction, I would use a rigid catheter and progressively advance it up the urethra while hydropropulsing with the saline the entire time. Once unblocked, then I will tape it to the tail as aforementioned.
Quick Tip: Once you have the catheter in the tip of the penis, pull the prepuce straight out to straighten the penis and thus the penile urethra. Otherwise, the bend in the penile urethra may hinder the passage of the catheter.
Benefits
The benefits I see of placing a temporary urinary catheter include:
immediate relief to the patient and reduces their stress levels
provides a sample for urinalysis
allows you time to run through the diagnostic and treatment plan in more detail with clients
buys you time to stabilise the patient for their anaesthetic later to place a closed system indwelling urinary catheter and then bladder lavage
Quite often, your patient would present unwell enough that you should have no issues (resistance to) passing this temporary urinary catheter, provided you have given pain relief on presentation.
In fractious patients, I usually forgo the temporary catheter and focus on stabilising the patient. The aim is to have them stable as soon as possible for sedation or a general anaesthesia to place a longer indwelling urinary catheter.
These formulae better estimate the needs of smaller and larger patients. The flat 3ml/kg/hr underestimates for small patients and overestimates for larger patients.
This maintenance rate is in addition to rehydration rates.
So what sort of fluid should you use for maintenance?
True “maintenance” crystalloids:
used to replace ongoing fluid and electrolyte loss from normal metabolism, not to replace perfusion and hydration deficits or ongoing losses from diarrhoea, for example
sodium concentration less than plasma
potassium concentrations higher than plasma
glucose sometimes added to bring solute concentrations similar to extracellular fluid
Do you have to use maintenance crystalloids or can you use replacement crystalloids?
Replacement crystalloids are more frequently used for maintenance fluid therapy rather than maintenance crystalloids. This is because they are more readily available, we are more familiar with their use and effect, and patients are generally continued on these after perfusion and hydration deficits have been corrected.
In reality, most of the time it doesn’t really matter if we are using replacement crystalloids for maintenance therapy as the patient can manage the excess sodium, but some patients – especially cats – may require potassium supplementation. The key point is regular assessment of the patient’s hydration status and electrolytes – for example, every 12 to 24 hours for patients on IV fluids and not eating.
Thanks to it that shall not be named (the pandemic) I started my clinical work experience or “extramural studies” (EMS) a little later than is usual for a veterinary student.
Having 10 weeks of work experience cancelled out from under me in 2020 did feel incredibly frustrating at the time, but in hindsight, I think it made me appreciate my first few weeks of clinical work so much more.
With this in mind, I wanted to provide a couple of tips for any student who, like me, are a little late to the game, or who are simply looking to get a little more out of their placements – whether it be clinical or pre-clinical.
1. Don’t be afraid to ask questions – or answer them!
I’ll be honest, I dread being quizzed and questioned by a seasoned veterinary professional as much as the next person. The key, however, is to think back to your university interview days: it is impossible for you to know everything, and there are bound to be parts of the course you haven’t even covered yet – vets do understand this.
When you’re asked a question in practice, you’re not expected to get it right 100% of the time, but to give it your best shot. Questions are designed to get you thinking, and as long as you apply yourself and have a go, you’ll gain far more respect from your peers than if you hadn’t tried at all. Remember: any answer is better than a blank-faced stare of internalised horror.
Likewise, vets expect you to ask questions back, so if you don’t know the answer to a particular question asked of you by one vet, there’s nothing stopping you from asking another vet about it later in the day.
Be curious and engaged, and if you don’t understand what’s going on, just ask.
2. Get stuck in
Now this one certainly applies to any stage of your training, whether you’re visiting a farm or a referral hospital. Placement providers appreciate students who aren’t afraid to get their hands dirty – be it literally or metaphorically – so pick up that broom, laryngoscope, mop or stethoscope and give everything that’s offered to you a go.
Vets are often busy and focused on the task at hand, so you may have to ask if you can have a go at intubating, or that SC injection, or using the thermometer. The worst they can say is no if, perhaps, there isn’t time. However, in my experience, asking to try something makes them more likely to offer you the chance further down the line.
When it comes to certain things, it helps to take initiative:
See a dull looking calf? Report it to the farmer.
See a dirty consult table? Clean it.
And if you find yourself without anything to do between consults and ops, or in a lull between milking sessions, asking a nurse or farmhand if there are any odd jobs that need doing is a surefire way to bring a smile to their day.
When it comes to most farms/vet practices, there’s always something to be done.
3. Keep your head in the game
To paraphrase Dolly Parton, working 9 to 5 can take its toll – and I’m sure she would have been shocked to know the hours an average vet or farmer clocks in each week.
Not many vets work 9 to 5. Some work 12 hours a day or even longer, and if you’re not used to a busy work week then you may find yourself flagging by day four or so.
It can be all too tempting to zone out, check your phone or stare out of the window thinking about what you’ll have for dinner that evening – but all the time you’re doing that, really interesting stuff could be going on around you without you even knowing.
No placement provider is impressed by a student who looks bored or disengaged, but beyond that, by not paying attention you’re robbing yourself of really vital experience that is only meant to benefit you and your career.
Try bringing a bag of mints or sweets to keep your energy topped up during the day, bring a notebook or revision book to study from in the quiet hours, and maybe leave your phone in your bag instead of your pocket, so you won’t be so tempted.
4. Enjoy it!
At the end of the day, EMS is meant to be an enjoyable and exciting experience. It’s a glimpse into the future for most vet students, and even for students who choose not to go into clinical work, it can teach you a lot about client communication, business management and how to cope with a busy workload.
It’s perhaps a slightly overused saying, but when it comes to work experience, “you only get out what you put in” – so I wholly encourage you to throw yourself into your placement (not literally of course – literally, walk calmly and confidently into your placement).
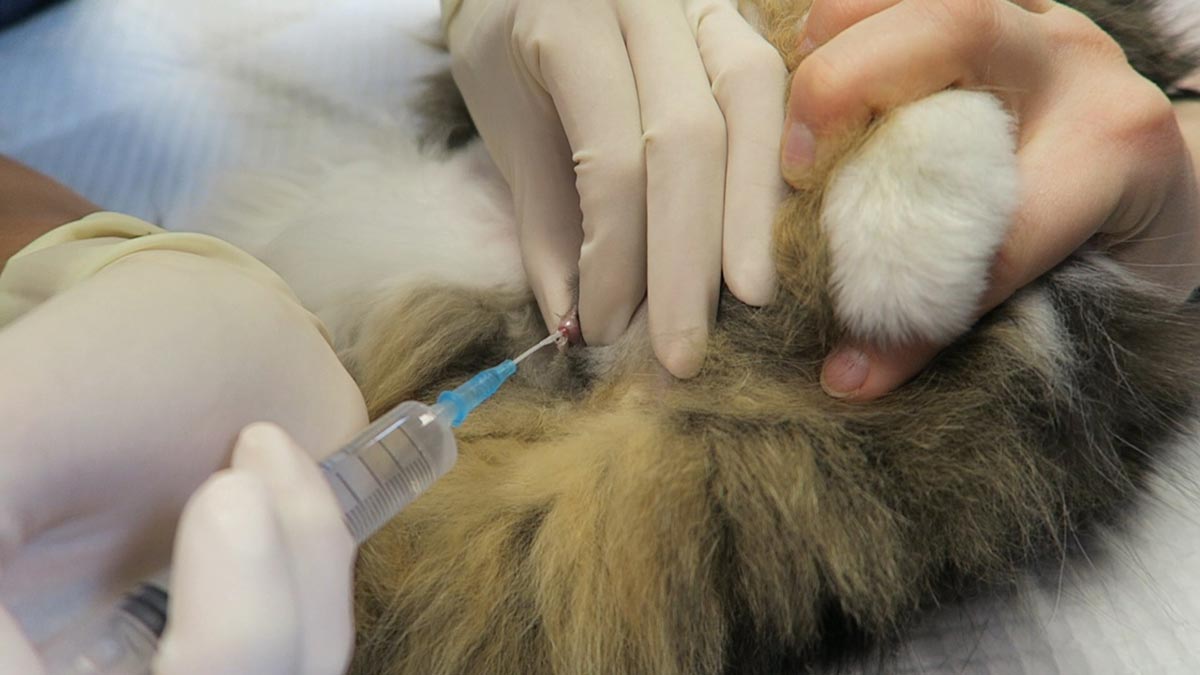
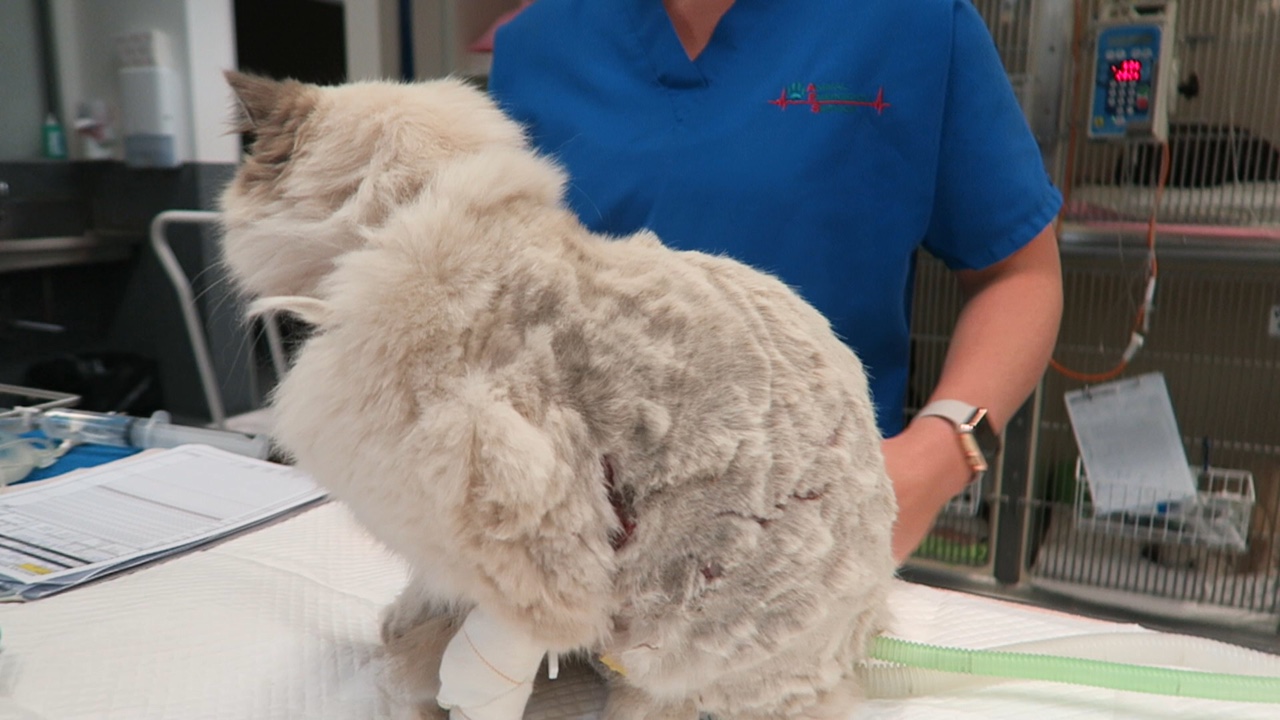
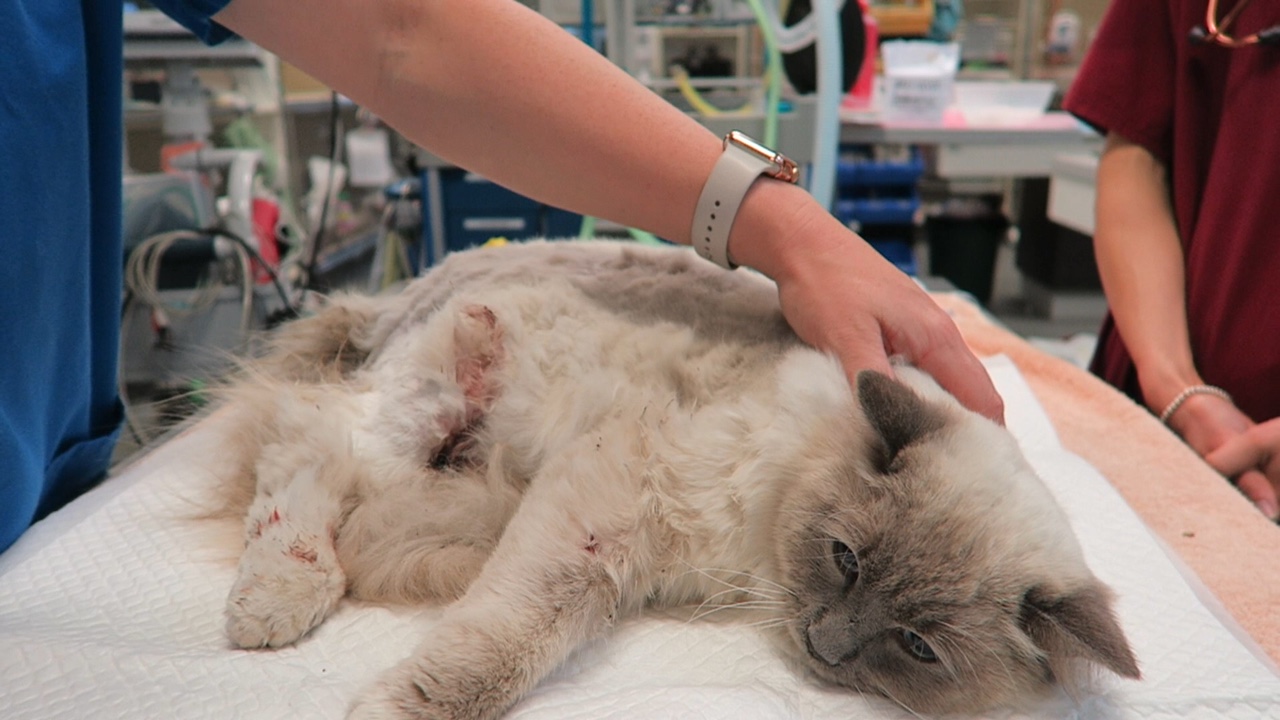
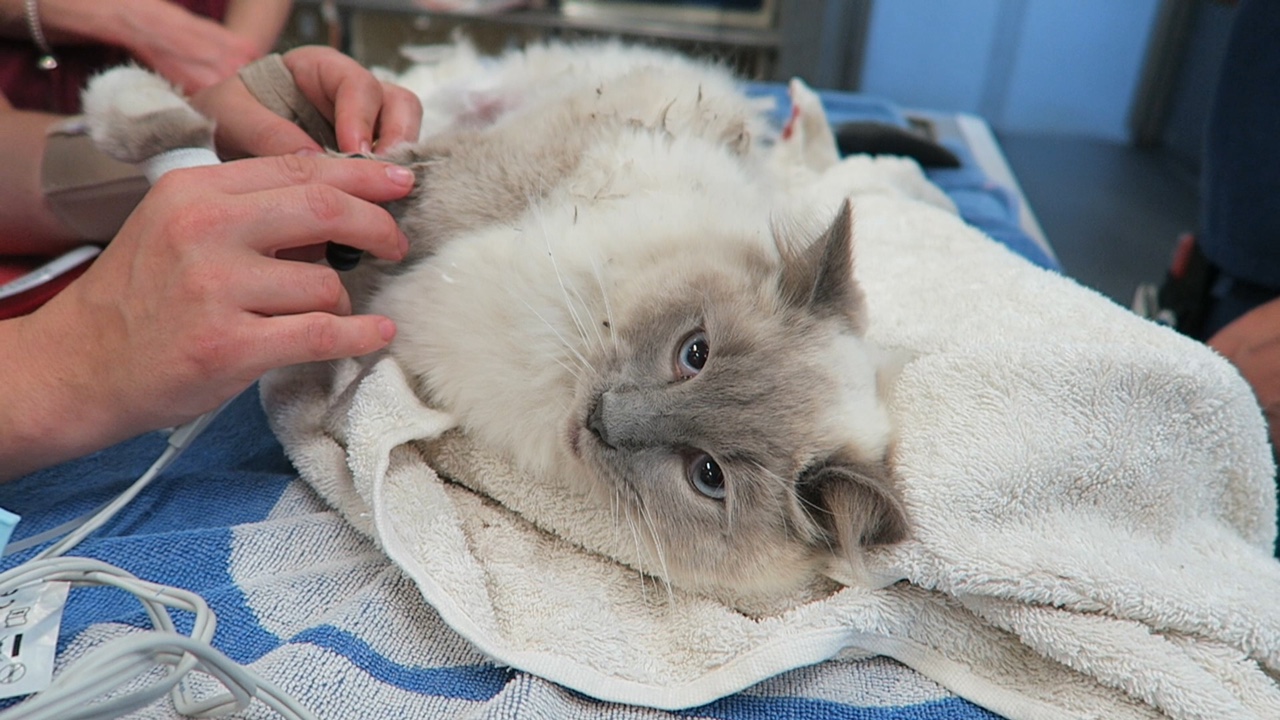
Cat bite abscesses are one of the most common presentations in general practice.
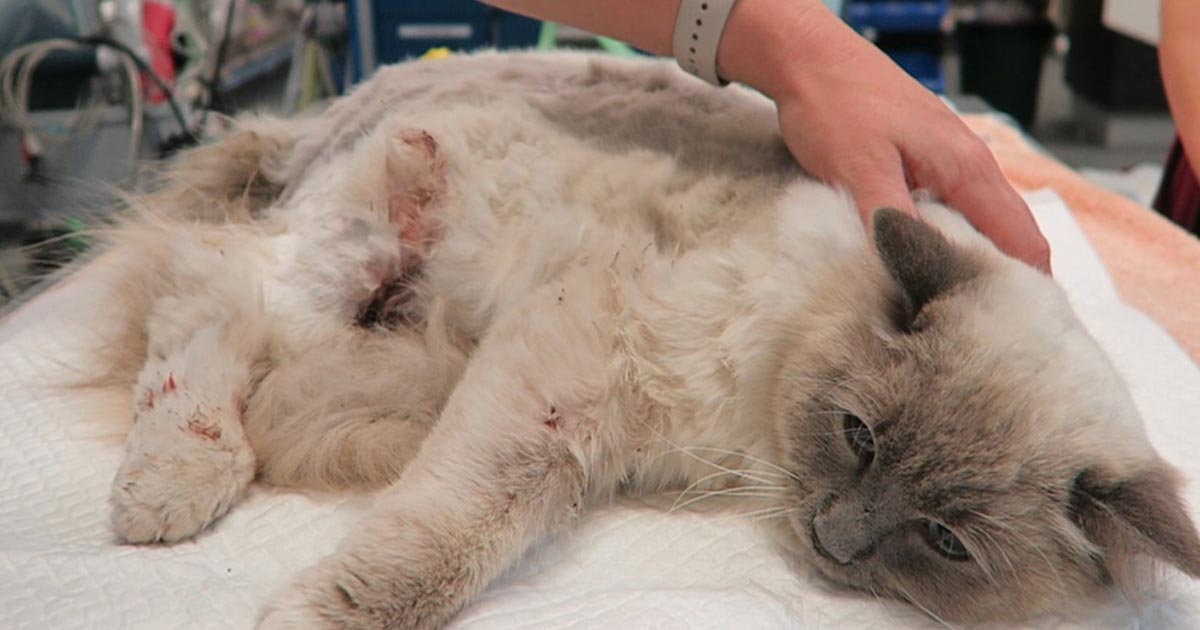
Even in an emergency setting, I see a number of these patients. Usually they are obvious, but, occasionally, they’re not so obvious and the patient comes in lethargic, inappetant and often “painful”.
Overly dramatic?
One thing I’ve learned in my time is a cat bite abscess should be considered for all cats that have pyrexia. For a pyrexic outdoor cat without an obvious cause, I include a whole body clip as part of my diagnostic process. This is because a cat bite can start as a cellulitis and bite wounds are very small.
Whole body clipping may sound dramatic, but it has saved me many times and helped rule out cat bites as a major differential for cats with pyrexia.
Standard approach
Everybody treats cat bite abscesses in their own way, but here’s my approach:
Any warm, painful area or swelling should be clipped to look for bite wounds.
I always look for all four tooth marks – you can miss wounds and other developing abscesses by focusing only on the obvious bite wounds.
You must establish drainage, surgically explore and lavage. This means patients are always placed under heavy sedation or a full anaesthetic. Why do I always recommend this? I have found cat nails, hair and teeth in abscesses before; without removing those foreign bodies, the abscess won’t heal and antibiotics won’t be effective.
I almost always administer antibiotics, even if I have removed an abscess en bloc and no contamination exists.
Pain relief is always indicated, depending on the age and stability of the patient. An NSAID is my preference, but only after I have corrected my patient’s fluid deficits, otherwise I select a different type of analgesic.
Drains? Sometimes I place drains in very large abscesses, but mostly I prefer to close primarily after appropriate debridement.
Following on from July’s post entitled Urinalysis: the neglected test, let’s have a look at the dipstick – it’s a very easy part of a urinalysis and essential to perform.
Here are some of my tips in regards to using dipsticks:
Dipstick: despite the name, DON’T DIP!
It may sound obvious, but you should always use veterinary-specific dipsticks. Human-specific dipsticks include panels for urobilinogen, nitrates and leukocytes, which we often do not interpret in small animal patients, as they are neither sensitive nor specific.
DON’T DIP! Use a syringe and drop samples on to each square, leave for 10 seconds, then flick off the excess.
Any amount of protein in dilute urine should raise suspicion. A reasonably large amount of protein has to be present in the urine for it to be positive on a dipstick. A urine protein to creatinine ratio may be the only way to quantify the amount of protein present, but first you must rule out evidence of inflammation or haematuria via a sediment examination.
The ketone panel on the dipstick test is only for acetoacetate (and not beta-hydroxybutyrate), although it is extremely rare for diabetic ketoacidosis patients to not produce any acetoacetate.
Trace blood can be a common artefact finding, especially during a cystocentesis where needle trauma can contaminate the sample with blood.
In our feline patients, any hyperbilirubinuria is abnormal, but this may be normal in a dog depending on urine concentration.
As the new academic year begins, veterinary schools across the UK are welcoming student vets on their journey to their chosen careers. While we all hope this year will be less eventful than last year, there’s little doubt that many large lectures will continue to be recorded or put online to minimise the spread of COVID-19.
Learning with technology is fast becoming standard practice for vets. There are eye-catching new tools, like simulation models that mimic arrhythmic heartbeats and augmented reality videos to demonstrate catheterisation, but there are also more subtle technologies many students may not think about. Lecture recording – the practice of capturing audio and visual representations of the lecture – is now common in many universities across the world.
There is a temptation to think about lectures as they were in James Herriot’s day, with a lecturer standing in front of a chalkboard drawing complicated anatomy diagrams while students squint and try to capture as much as they can on paper. Now – with smart boards, PowerPoints and recordings – students can have a much more complete record of the material covered – and fewer hand cramps.
While some lecturers have been concerned that recordings will stop students learning how to take notes, research at the Royal (Dick) School of Veterinary Studies has found many students use recordings very effectively in their study strategies.
In this work, some of which was funded by Echo360, a video-based teaching and learning platform, we have identified five top tips for students who want to make the most of studying with lecture recordings.
Whether your lecture is on campus in a bustling lecture hall or on a screen from the comfort of your bedroom, these tips will help you to get the most of your time at vet school (and we won’t lie, they are good for online CPD, too, for those qualified vets among you).
TIP #1: Know what the lecture is for
Most lectures will have “learning outcomes” or “instructional objectives”, either clearly detailed at the start of the lecture or highlighted as part of your course material (such as the course handbook).
Learning outcomes are a great way of making sure you have understood the purpose of the lecture and met its aims1. Learning outcomes usually begin with a statement like “at the end of this lecture, you should be able to…”. Unsurprisingly, these are the skills you should be able to do after you’ve finished the lecture!
Imagine a lecture designed to teach you how to make the perfect cup of tea. The learning outcomes might be:
Identify the sugar caddy, tea caddy and milk jug in the kitchen.
Describe how you would assess a person’s tea preference.
After the lecture, you should be able to go into your kitchen and point to the relevant equipment, and ask your guest how they like their tea to be made.
If you haven’t been able to achieve these things after the lecture, you might want to revise the topic again, review the recording, or ask the lecturer clarifying questions (“can you describe the sugar caddy again, Doctor?”). If you’re not sure what the learning outcomes are, be sure to look in your course handbook, but also don’t be afraid to ask your course organiser or lecturer.
TIP #2: Lectures as the diving board
Although it can seem as though you’ve just had an ocean’s worth of material dumped on your head in a lecture, your lecturer will be thinking you’ve barely dipped your toe in the water.
Often, the lecture is an introduction to the subject, a diving board that helps you find the right materials to study further. We’ve seen in our studies that students can use lecture recordings in all sorts of inventive and useful ways to support their learning.
Photo by Markus Spiske from Pexels
It might be tempting to put lecture recordings on while doing the dishes, like your favourite Netflix series, but studying should be a dynamic activity. In one study2 we found vet students would watch recordings, pausing often to look up references or clarify concepts from their own notes.
We’ve also seen that students like to revisit their lectures on EMS3 – particularly to reconsider tricky topics that may have come up on placement, or just as a reminder that they do know this material really.
TIP #3: Make good notes
While it’s easy to say “make sure you study actively with recordings”, it can be a bit harder to imagine what that looks like. Here are some of our recommendations for making the best of your notes.
Remember that your notes can (and maybe should) begin before the lecture. You will most likely know the topics in advance, so outline what you think you’re going to learn, and even some potential questions before you review a lecture recording or go to class.
Leave gaps in your notes where you might want to revisit important phases or concepts. This is particularly useful in recorded sessions, because you can concentrate on listening to the lecture, knowing you can revisit the recording and look up the spelling of “blepharorrhaphy” later. We all know that’s suturing eyelids, of course, but if you weren’t sure, you could test yourself when you’re filling in your notes after class by researching the answer after you’ve made a guess.
It’s important to remember that the best notes aren’t just a transcript of the lecture. The recording is there to help make sure you don’t miss the details, but you need to return to your notes and expand on them. There should be more in your lecture notes than what was said by the lecturer.
The notes you have at the start of class won’t be the same notes you have before the exam. The notes should evolve with you and your understanding of the subject. You may find it useful to reorganise your notes as you study. It might not be logical to you to have them in the order of your lectures. Most importantly, your notes are for you and don’t need to be pretty, or make sense to anyone else.
One of the great things about recordings is that they give you the freedom to experiment.
Let’s say you wanted to try a new way of taking notes, like the Cornell system4, you can pick a recorded lecture to experiment in. If you hate it, you can use the recording to fill your notes in again. Perhaps you feel you might concentrate more if you take notes on pen and paper instead of on a laptop – why not try it out?
You may also find it useful to take and store your own notes online alongside recorded lectures or, if your institution has one, use a dedicated chat thread to discuss them with your lecturer or fellow students. It can be helpful to supplement your own understanding of the topics being covered by drawing from different perspectives.
Vet school can feel very pressured, but experimenting is a really important part of learning. Taking the step from school to university can be a great time to figure out what works for you, and what you might want to change.
This tip is also especially useful for graduated vets who are working on CPD recordings – what worked for you before you graduated might not work when you’re also running a practice and dodging children underfoot.
We’ve heard that our students like to use recordings in group study sessions. Think about sharing your notes in sessions like these, be they in person or over an e-conferencing platform. Can you get any tips on organisation from others, or help each other to get a better understanding of the topic? These kinds of group discussions are so important, both for learning the topic, but also learning how to become collegiate vets.
My final tip is to try to relax. The last 18 months have been tough on everyone, and you might be worrying about sitting formal exams again, anxious about leaving your family dog behind or simply concerned about how you’ll balance all the clubs you’re trying to join.
Everyone needs a sick day occasionally, and one of the big things we’ve heard from our students is that having recordings and virtual learning environments can help take some of the pressure off.
Ultimately, the way you study will be very personal to you. The tools and technologies are there to help, and they are worth exploring and experimenting with. Most of all, take the time to enjoy these lectures. They are the first step on the path to becoming the vet you’re going to be.
A few weeks ago in the Tip of The Week, we discussed the four basic components of a fluid therapy plan – perfusion deficit, hydration deficit, maintenance requirements and ongoing losses.
Let’s consider perfusion deficits.
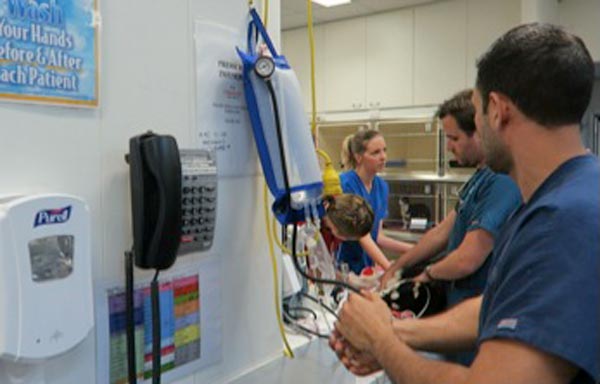
As an emergency clinician, correcting perfusion deficits is a crucial part of stabilising a patient. So what is a perfusion deficit? It either refers to a real or relative loss of intravascular fluid volume, or low blood pressure, leading to a decrease in perfusion of tissues and, ultimately, decreased oxygen delivery – ie, shock.
What does this look like clinically?
Operating the pressure infusor at the triage bench.
Clinical signs of perfusion deficits include:
pale gums
reduced capillary refill time
tachycardia
reduced pulse pressure
dull mentation
cold extremities and low core body temperatures
A low normal body temperature in a critically ill patient should alert you to the possibility the patient may be experiencing early perfusion deficits, but is not yet severe enough to result in a low body temperature.
What are these signs caused by?
These signs are caused by activation of the sympathetic nervous system in response to reduced blood pressure (BP).
BP is the product of cardiac output (CO) and systemic vascular resistance (SVR):
BP = CO × SVR
CO is the product of the heart rate (HR) and stroke volume (SV).
CO = HR × SV
Reduced perfusion results in reduced BP. The body increases BP by activating the sympathetic nervous system, resulting in a compensatory increase in HR and SV (beta adrenergic), which increases CO and vasoconstriction (alpha adrenergic) of the peripheral blood vessels to increase SVR and shunt the blood to the heart and brain.
Peripheral vasoconstriction is seen clinically as pale gums, reduced capillary refill time, cool peripheries and low body temperature as blood is being shunted away from those peripheral capillary beds. It also results in reduced pulse pressures.
In summary, clinical signs of perfusion deficits are signs of the body trying to compensate and push blood to where it is needed most.
Blood pressure is normal, it can’t be in shock?
Since the body’s compensatory mechanisms are geared towards preserving blood pressure, it often remains normal in patients with shock until the body cannot compensate any longer – decompensated shock.
So, to me, normotension does not rule out perfusion deficits and hypotension is an indicator of severe perfusion deficits.
Are IV fluid boluses safe for all patients in shock?
Preparing a Hartmann’s fluid bolus.
The vast majority of the time I would say yes, but you must ask one question – could this patient be in cardiogenic shock? IV bolus therapy would be contraindicated in most of these patients.
Is it a small-breed dog presenting with a murmur and dyspnoea? Or a large-breed dog with an abnormal heart rhythm? If so then diuretics and anti-arrhythmic medications may be indicated rather then IV fluid boluses.
How much volume can you give?
I generally give buffered crystalloid fluid boluses of 10ml/kg over 5-10 minutes. I repeat this while monitoring for resolution of clinical signs of perfusion deficits. If I get to half a blood volume – 45ml/kg in a dog and 30ml/kg in a cat – I ask myself what could be causing this ongoing perfusion deficit. Could it be:
Distributive or vasodilatory shock from anaphylaxis or sepsis? In which case, vasopressors – such as adrenalin, dopamine and noradrenalin – are indicated.
Cardiogenic shock from dilated cardiomyopathy? Are diuretics, anti-arrthymic medications or positive inotropes required?
Restrictive shock from a gastric dilatation-volvulus or pericardial effusion? Is gastric decompression or pericardiocentesis required?
Does continued hypovolaemic shock exist? If so then continued fluid therapy is indicated, but this may cause significant haemodilution. Consider colloids or blood products, such as packed red blood cells, whole blood or plasma. Does it need emergency surgery or abdominal compression to stop an internal bleed?
Perfusion deficits need to be corrected rapidly as continued oxygen delivery to tissues increases the risk of organ dysfunction and, ultimately, organ failure.
If the effusion is haemorrhagic, here are some things to look out for.
Real or iatrogenic origin?
Blood rapidly defibrinates in cavities – so if it clots, it is iatrogenic.
If it swirls during collection, it is more likely to be iatrogenic.
Is it acute or chronic?
Compare PCV/total protein (TP) to peripheral. If sample PCV/TP = peripheral blood PCV/TP then a recent bleed is most likely the cause.
Always run a PCV/TP on haemorrhagic effusions – don’t always assume it is from a large haemorrhage. Effusions with low PCVs (for example, 5) can look like frank blood.
If sample PCV is low, but TP the same as peripheral blood, the bleed is likely chronic.
If erythrophagocytosis is present, it is chronic. Look for macrophages, containing dark brown to green pigments, in your smear.
Assess for the presence of clumped platelets. These can mean intravascular sampling or a very acute bleed.