QUICK TIP: Need to know if there is an oesophageal foreign body but can’t be certain on radiographs?
We have all been in the scenario where we are unsure whether there is an oesophageal foreign body on the radiographs we have just taken.
You might think of using a contrast medium to help, and the first that always comes to mind is barium. However, my personal first choice is a iodinated contrast medium – urografin, for example.
Advantages
Why? Their use is typically limited to myelograms or intravenous contrast studies but they can be given orally as well, for the assessment of oesophageal foreign bodies.
Lateral feline chest radiograph after contrast.
The advantage of using this over barium is that if this dye is accidentally aspirated it does not cause pneumonia like barium can.
How to
Using iodinated contrast medium is simple:
Given orally non-diluted, Dogs: 5-10ml, Cats: 5ml – you can give more if necessary
Immediately repeat the radiographs
If there is anything in the oesophagus, it will be highlighted
One of my responsibilities in our emergency hospital is the training and mentoring of vets new to the field of emergency and critical care.
FIRST LOOK: The patient was bitten by another dog and presented with multiple puncture wounds and difficulty breathing. Radiographs were taken to assess for thoracic injuries (click to zoom).
A common area I have found where clinicians request more training is radiographic interpretation.
When I review radiographs and find pathology that was missed, it Is more often due to a lack of systematic approach to reviewing the radiograph than the clinician’s lack of experience or knowledge.
There is, of course, no one set way you should go about interpreting a radiograph – but whatever the method, the entire radiograph should be assessed, not just the area of interest.
Radiograph tips
Try not to struggle with your patient. If possible, appropriately sedate your patient (or anaesthetise if safe to do so). This reduces stress for everyone involved and improves your chance of getting a good radiograph. For musculoskeletal radiographs, you often need to manipulate painful joints and limbs to get diagnostic images.
Take appropriate views. For example, I aim to get three plane projections for thorax and abdominal radiographs – i.e. left and right laterals and VD (or DV). Three views are critical for the assessment of both lung fields, and also to help interpret abdominal gas patterns more effectively.
Collimate, rotate, crop, label and adjust the image appropriately. Displaying radiographs in a standardised format is important for proper assessment. Reviewing anatomy in the same way each time helps develop an understanding of what is normal, and makes identifying abnormalities easier.
This is my top rule: At first, IGNORE the area you are interested in. This means, if you are interested in looking at the GI tract in a vomiting dog, try not to focus – albeit initially – on the stomach and intestines on your radiograph.
Start at the periphery. This means things like the spine, subcutaneous tissue, etc – you would be surprised how often lesions are missed in these areas.
SECOND LOOK: This fracture was missed on initial review of the radiographs (click to reveal).
Now take a look at the cavity space (the pleural and abdominal space, for example). You should not be able to see the pleural space, and you should see no evidence of air or fluid in the abdominal space. When it comes to musculoskeletal radiographs, don’t forget to consider joint cavities and soft tissue structures such as ligaments and tendons.
Lastly, make sure you assess every organ (again leaving your organ of interest until last). Things often overlooked include the prostate, kidneys and mediastinal region. At the end of this, I always ask myself, have I missed an organ?
Tunnel vision
Another thing I like to do sometimes is take a step back and assess the radiograph again. I find this gives a better global view of the projection, as opposed to staring at it closely.
This is because when we focus on our area of interest, we start developing the habit of tunnel vision, introducing the potential for missing lesions.
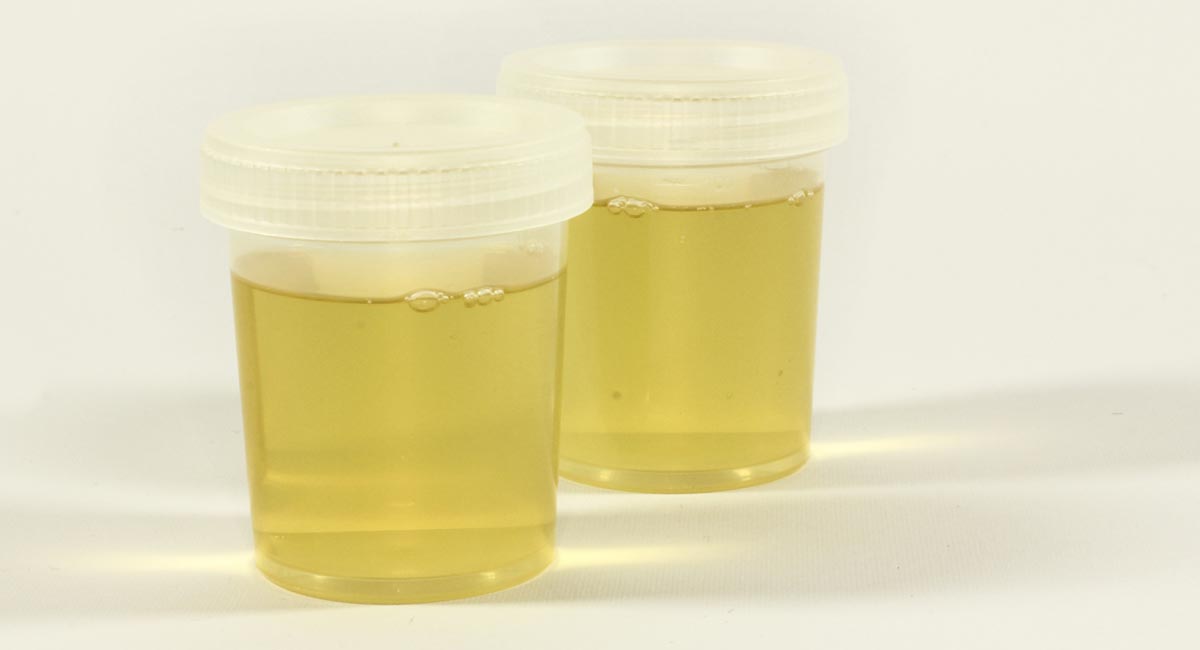
Urinalysis is an important diagnostic tool in veterinary practice. It is indicated for any patient that presents with polyuria or urinary tract signs, but also a necessary test to perform in conjunction with serum biochemistry.
Urine sediment exams on Christmas day.
Why do some clinicians fail to perform urinalyses even when they are indicated?
Reasons include:
clinicians not seeing the importance of obtaining a urine sample
the difficulty of obtaining a sample in some situations (the patient may not want to void)
no access to an ultrasound for a guided cystocentesis
patients not urinating upon bladder expression
Make it a priority
However, it is important clinicians make obtaining a urine sample a priority. Where possible, a sterile sample of urine using ultrasound-guided cystocentesis is recommended, especially when there is a possibility the urine may be sent to an external lab for culture and sensitivity.
For example, we’ve all been in situations were you start a patient on IV fluids only to find an azotemia on blood tests. Now you can’t determine whether it’s a pre-renal or renal cause, as you don’t have a pre-IV fluid urine sample.
Also it would be best to avoid the situation where you have run all other tests available on an ill patient only to find the answer lay in that urinalysis you did not collect earlier.
What do you say to clients when a mistake has occurred? Do you tell the truth; just discuss the basics, but leave out any incriminating facts; or go full Donald Trump mode?
Studies into what influenced the decisions of patients, who were the victims of medical error, to take legal action show litigation is most often associated with a perceived lack of care or collaboration.
In other words, we are sued when our clients feel we don’t care about them.
In their shoes
So, how do we show we care when we’ve made a mistake? What do our clients want, and how can we give it to them?
Start by getting your head right. An attitude of genuine empathy towards the client is likely to deliver the best outcomes for both you and the client in question.
Ask yourself: “If I was in this client’s shoes, how would I feel? What would I have liked to happen in this situation?”
Rehearse what you’re going to say to them – accept their initial response may well be anger, resentment and accusation; and resist the temptation to become defensive.
An emotional client may also not be ready for logical reasoning. Instead, try to acknowledge his or her feelings by using statements of empathy, like: “I can see you are very upset with me, and I understand why.”
Face to face
If possible, have the conversation in person. Apologise if it has to be done over the telephone.
Be upfront from the start: “I have some difficult news to share. I’m very sorry to say we’ve had some complications with Rover’s treatment. Would you be able to come in so we can discuss the details and talk about how we are dealing with the situation?”
When we’re having that difficult conversation, what do clients want to hear from us in these situations? Again, by collating the research, we get some very clear guidelines on this…
What to do
Clients want us to:
Be very clear that a mistake has occurred.
Give an explicit apology. We can differentiate between two types of apology:
If something has gone wrong because of a treatment error or a breach of standards, an apology of responsibility is most appropriate: “I’m sorry we made this error and that it has had negative outcomes for your pet.”
When an unexpected adverse outcome has occurred, but no errors have been made, a heartfelt apology of sympathy is still appropriate: “I’m very sorry this has happened to your pet and that you have to go through all of this.”
Explain the facts. What exactly happened that led to the event in question?
Explain the medical ramifications to their animal in both the short term and long term.
Tell them how the care of the animal will be managed.
Be clear about who’s going to pay for it. If a genuine error has been made, the expectation is generally that ongoing care will not be the financial responsibility of the client. Compensation over and above medical costs should also be discussed. This does not mean money has to be offered immediately, but a statement that acknowledges you are conscious of the fact the client may have suffered because of what has happened will go a long way towards stopping an immediate escalation of the situation. Ask “is there anything we can do to help resolve this situation?”. Actual compensation will then need to be worked out with the insurer, but research shows the dollar amount of any compensation eventually paid is often less if an offer of compensation is made early on.
Tell them how a similar event will be prevented in the future. Patients who have been affected by medical error indicated that simply knowing “something good has come of this” reduced their negative feelings about the event.
Career-defining
Effectively communicating with clients in these emotionally charged situations can be challenging; but an approach of empathy, collaboration and transparency can steer these career-defining moments away from catastrophe, and towards personal growth and increased trust.
Part one of this series looked at how to think about making mistakes, and how to not let the fear of mistakes stop us from extending ourselves. But what do we do when what we fear happens? When you’ve done something, or didn’t do something, and the outcome for your patient has not been good.
Luckily, we have decades of research – from both the medical and veterinary worlds – to learn from.
Some of the findings may run counter to our first instincts of damage control and self-preservation, but the recommendations about an ideal course of action are all pretty consistent:
Take care of the patient
Your first priority needs to be to implement a plan of action that will minimise the damage caused by the adverse event and takes care of the patient’s immediate needs.
Take care of yourself
Start by speaking to someone. Tell a trusted colleague who can look at the situation objectively.
A third party can help you put the event in perspective and assist in formulating a plan of action at a time when your emotional response may be hindering the clear-headed thinking required. Get clarity on what the real implications of the situation may be, and what you could do about it.
Ask yourself: what is the worst possible outcome that can come from this? What will the day-to-day practical implications be? What will this event look like to me one year from now? Will I be okay?
Then ask yourself: is there anything I can do now to prevent this worst-case scenario?
Speak to your insurer of local defence society
Insurers and defence societies will be able to guide you through the process, and tell you what you should and shouldn’t say. Equally as importantly, they will reassure you, if the worst comes to the worst, you have a fallback.
It is critical you are very clear on the events that led to the undesired outcome.
Some of these situations can be complicated – but do everything you can to determine whether what has happened was a preventable situation that occurred because of some error on the part of the team, or just an unintended consequence that came about despite everyone acting in a way most vets would have.
If the facts are not immediately clear, assure the client you are investigating the incident and that you will report the findings to him or her – and be sure to keep this promise.
Speak to the client
Without a doubt, for most of us, dealing with the client is the hardest part of managing mistakes.
Research shows the right approach can minimise the risk of litigation, reduce the chances the client will leave your practice, reduce the amount of any potential financial ramifications, and that it’s possible to strengthen the trust and loyalty the client has to the practice.
Learn from it
When the dust has settled, it’s important the events leading up to an unwanted outcome are evaluated with honesty. Making mistakes is acceptable, but failing to learn from your mistakes is not.
Was the thinking that led to the decision-making process flawed, or was it a failure in instituting the plan? What needs to change?
You owe it to the client, your patients and yourself.
Part three will look at how to best approach the client and what to say to him or her.
When we polled young veterinarians about what their career concerns were, more than half of the respondents listed worrying about making mistakes as one of their biggest problems.
This is not surprising, and not altogether unwise, considering the myriad of things that can potentially go wrong. However, making decisions based primarily on trying to avoid stuffing up can have very negative effects on our working lives.
So, how can we think about mistakes in a better way?
Impairing growth
The anxiety that comes from a fear of making mistakes – that ever-present uneasy feeling of “what have I forgotten?” – is a big enough problem in itself, but a more insidious and possibly more damaging consequence exists that arises from an “error avoidance” based approach: you run the risk of not becoming the best possible version of yourself.
Avoiding all risk of failing by never undertaking anything challenging might protect you in the short term, but it also keeps you weak. To allow growth, you need to continuously push yourself – even when it puts you at risk of making mistakes.
To be sure, making mistakes will be painful, and our natural inclination is to avoid pain, but pain is a very good teacher. When you do make a mistake, you will think you’ve failed, but you only really fail if you give up. The pain will eventually go away, but the lessons will remain.
Feeling good
The flip side of pain is the pleasure of success. The rush of positive emotions you experience when you succeed at something hard creates positive feedback loops that will drive you to challenge yourself again and again. This will increase your general sense of self-worth and accelerate your professional growth. In the absence of this kind of stimulation, it is likely you will become bored and dissatisfied, and eventually stagnate.
While it’s easy to be philosophical about it, we need to be realistic about the fallout of actually making a mistake. Besides the immediate deleterious effects on the patient you are trying to help, we also worry about the effect on our future careers – not to mention the havoc this can play on our self-confidence.
We worry about losing the respect of our colleagues and peers. We want to feel and appear smart and capable – after all, most vets have a long history of success and achievement, so to suddenly be in a position where we’re faced with the embarrassment of failure is an uncomfortable new space to occupy.
So, how do we get past these fears? Well, for a start, you can get over the idea you are above making mistakes and that making errors is a sign of weakness or inferiority.
Forget about pretending you know everything. When you acknowledge to yourself and to others that you have room for improvement, you will make it easier on yourself and those around you. You don’t always need to be right. In fact, you almost certainly aren’t. And that’s okay.
This way, when you do mess up, it’s much easier to see it as an inevitable part of our profession and an opportunity for learning, rather than a personal failure. Reframe “mistakes” as “lessons” and take comfort in knowing that, if you are making mistakes, you are operating at the edge of your abilities – and it’s at that edge where the fastest growth will happen.
Ride bigger waves
Big wave surfer Shane Dorian once said that if he’s not regularly wiping out, it’s a sign that he’s not pushing himself enough, and that his surfing will suffer for it. Instead of sticking to the easily makeable waves at work, we need occasionally paddle for the ones that have the potential to give us a beating. It might be scary, but this is where you’ll get the ride of your life.
Instead of sticking to the easily makeable waves at work, we need occasionally paddle for the ones that have the potential to give us a beating. It might be scary, but this is where you’ll get the ride of your life.
Of course, you need to recognise which waves can hurt and which ones can kill. You also need to be fit and prepared, and know your limits – and if you end up in a big wipeout, you need to know how to get yourself out of trouble so you don’t actually drown.
In the next post we’ll look at some practical tips on how to best deal with the consequences of making mistakes.
Parts one, two and three in this coagulation series have gone over history, physical exam, signalment, and primary and secondary coagulation.
In this part, we are going to delve deeper into secondary coagulation, and look at the coagulation cascade and the specific testing we can do. We are going to answer:
What is the coagulation cascade?
What is a prothrombin time (PT) and activated partial thromboplastin time (aPTT) and how do they compare to activated clotting time (ACT)?
The coagulation cascade
We are going through the coagulation cascade using helpful tips that make it easier to remember – they were shared to me from one of our Vet Vault Clinical Podcasts on coagulation.
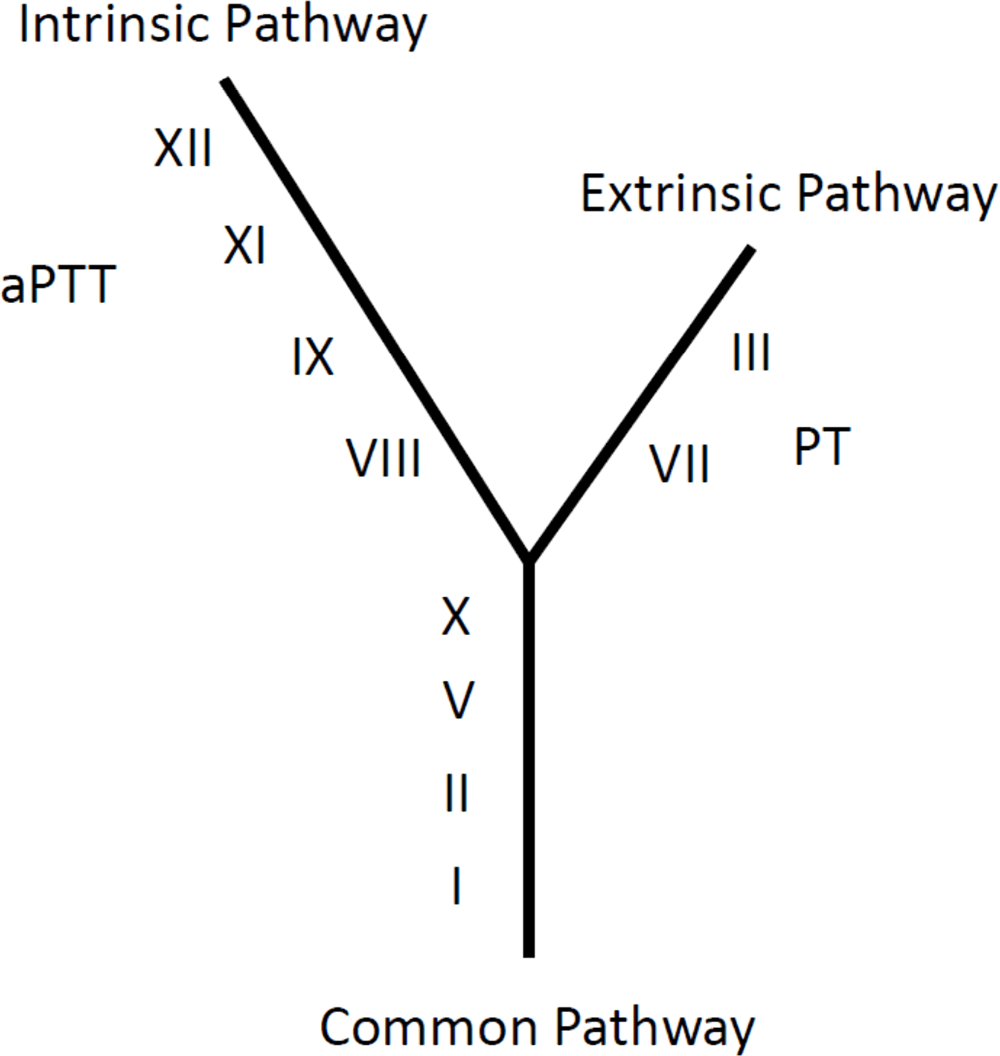
It is helpful to consider the coagulation cascade as a Y shape so you can remember the different factors.
The coagulation cascade consists of an intrinsic pathway, extrinsic pathway and common pathway:
Intrinsic pathway
Left arm is LONGER, so is assessed by the longer name – aPTT.
Four coagulation factors in the left: 12, 11, 9, 8.
One way of remembering this: £11.98 – rounded up to £12.
Extrinsic pathway
The right arm is SHORTER, so is assessed by the shorter name – PT.
Started by factor 3 as it is in every cell in the body.
Then followed by factor 7.
Common pathway
Four factors – 1, 2, 5 and 10.
Bottom factor is number 1 (fibrin).
The next one up is factor 2 (thrombin).
This is followed by factor 5.
Finally, 5 × 2 = factor 10 at the top.
Why is it important to know this?
It helps to understand how ACT, aPTT and PT are related, as it can help diagnose specific clotting factor deficiencies.
Both ACT and aPTT test the intrinsic and common pathways:
ACT will only detect if lower than 5% normal factor activity.
aPTT is more sensitive and will detect lower than 30% normal factor activity.
PT tests the extrinsic and common pathways.
So, if the PT is normal and aPTT is prolonged, you are dealing with an intrinsic factor deficiency – in other words, factors 12, 11, 9 and/or 8. This will likely be caused by a hereditary coagulopathy – for example,g haemophilia.
If the PT is abnormal and aPTT is normal, you are dealing with an extrinsic factor deficiency – the most common being factor 7. This is most commonly caused by early rodenticide intoxication, as factor 7 has the shortest half-life.
Following on from parts one and two in this coagulation series – in which we described how to use your history, signalment and clinical signs to help determine if your patient has a coagulopathy and narrow down the list of differentials – we now look at the diagnostic tests you can use to confirm your suspicions.
In the initial stages, you only need two simple tests – a blood smear and an activated clotting time.
Less than between 35,000 platelets per μL and 50,000 platelets per μL – equivalent to less than two to three platelets per 100× field – is required for a spontaneous bleed and you should consider that your patient has a clinically relevant thrombocytopenia.
If you see more than 10 platelets per 100× field, you do not have a thrombocytopenia causing bleeding.
Pro Tip #1
Anytime you are collecting blood, keep one drop for a smear – it saves you from having to stick the patient again, and you can easily throw it away later. You can also perform an ear prick if you don’t want to ruin a vein.
Pro Tip #2
If you can‘t find a platelet in the monolayer, check the feathered edge. If you see platelet clumps then you are all good.
If platelet numbers are normal then you either have:
a platelet disorder (thrombocytopathia)
a problem with secondary haemostasis (clotting factors)
Activated clotting time – tests secondary coagulopathies
Normal activated clotting time (ACT) is generally less than 120 seconds, or 90 seconds with some types of tubes. The issue with this test is that it requires a significant deficiency in clotting factors (less than 5% normal factor activity) for prolongation to occur. However, this is usually not a problem if they are clinically bleeding.
As a rough rule, if the ACT is greater than 25% of normal then it can be considered abnormal and you have a secondary coagulopathy. The ACT is an inexpensive and quick bedside test; however, partial thromboplastin time (PTT) and activated partial thromboplastin time (aPTT) are more sensitive, which will be further discussed in the next part.
Pro Tip #3
ACT can be prolonged with severe thrombocytopenia, so check your platelets.
Pro Tip #4
PT and aPTT are not affected by platelets like the ACT.
If your ACT is normal and your platelets are normal:
Consider thrombocytopathia. However, testing to see if PTT and aPTT are normal as well helps rule out a secondary coagulopathy.
Thrombocytopathia is assessed by performing a buccal mucosal bleeding time (BMBT), which will assess for platelet disorders like von Willebrand disease.
A BMBT of more than four minutes is abnormal.
Pro Tip #5
Avoid using a scalpel blade for a BMBT due to a large amount of error. Use a specific “surgicut”.
In the next part, we delve deeper into secondary coagulation disorders.
Following on from part one, where we discussed that just by getting a good history and assessing the signalment a list of differentials can be narrowed down, we now look at how we can continue to narrow down the list based on the physical examination findings.
Although we now understand the way coagulation occurs in the body is different from the primary and secondary haemostasis model, it is useful to use this model when it comes to diagnosing the underlying cause.
Primary coagulopathy deficiencies – involve the platelets
ONSET: Usually more insidious, not usually enough to present with life-threatening blood loss (unless gastrointestinal).
CAUSES: Petechiae, ecchymosis, bleeding from mucosal surface.
LEADS TO: Epistaxis, gingival bleeding, haematuria, melaena.
EXAMPLE: Older dog with continuous bleeding from a lump above eye.
Pro Tip
Think the three Ps: primary, platelets, petechiae
Gingival bleeding.
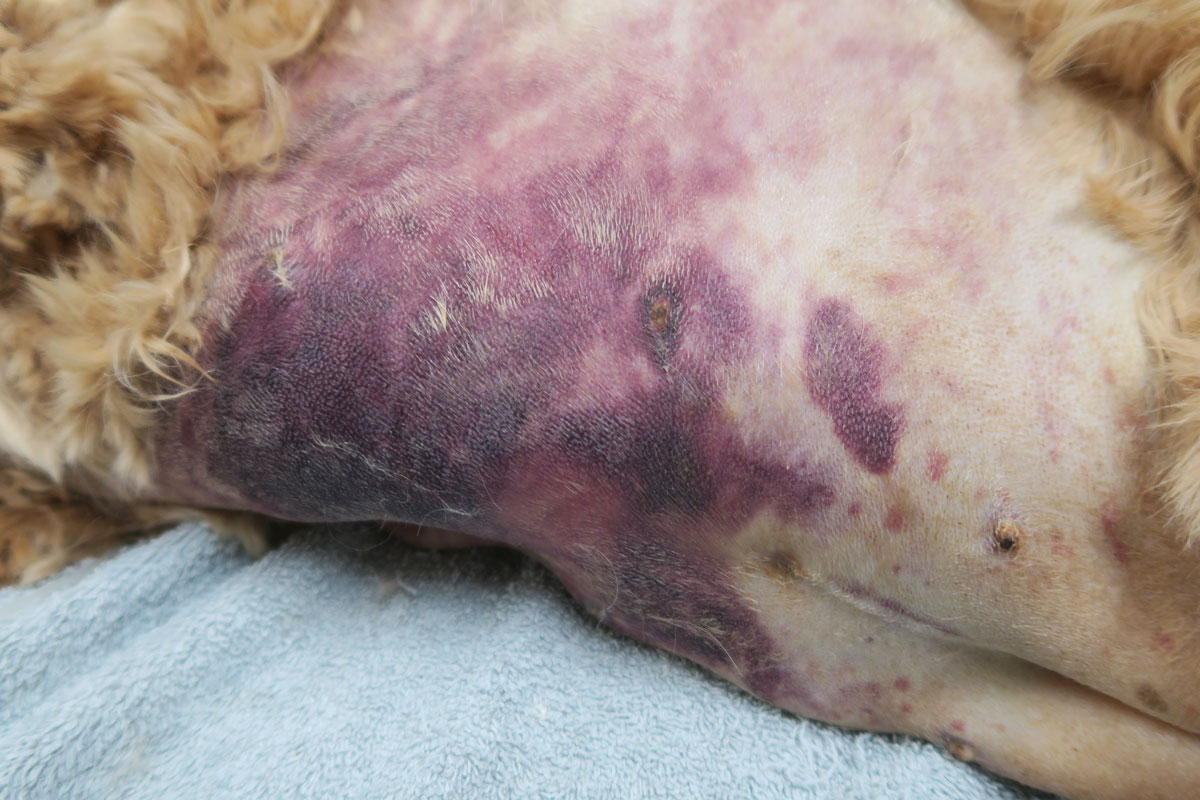
Secondary coagulopathy deficiencies – involve the clotting factors
ONSET: Usually more acute and present with life-threatening blood loss.
CAUSES: Bleeding into SC tissue, body cavities, muscles, joints.
LEADS TO: Haematoma, haemothorax, haemoabdomen, pulmonary haemorrhage.
EXAMPLE: Young dog coughing up blood, more likely secondary coagulopathy.
Pro Tip
Clinical signs overlap, so always rely on diagnostics to confirm your presumptive diagnosis.
Bleeding into SC tissue.
In part three, we cover what diagnostic tests you need to perform to confirm your suspicions…
A bleeding patient can be overwhelming but there are only a few pieces of equipment that you need and a step-by-step approach.
1. Ask yourself the question:
“Is my patient bleeding due to local issue (trauma, for example) or from a system coagulopathy?”
If a local issue is suspected like trauma, then treat as required. If unsure, treat the trauma anyway and then put your Sherlock Holmes hat on and let’s get started…
2. Assess the history
Important history questions:
Recent trauma?
This will help determine of the bleed was spontaneous or precipitated by injury
Is rodenticide used on the property?
Pro tip: Don’t ask if there is access to rat bait as a lot of owners don’t believe their dog can get to it and will say no.
Does your pet live in an enclosed yard or apartment building?
Snakes can cause coagulopathies, and are a common in some areas. However, it if the pet lives in an enclosed yard or inside an apartment building then snake bites are less likely, unless they are walked or have a property near bushland
History of previous successful surgeries?
Yes? Unlikely congenital
Current medications?
Some medications can cause a thrombocytopaenia although rare to be severe enough to cause spontaneous bleeding.
3. Consider the signalment
Amazingly the signalment can give us a good idea as well.
Young dog: Due to their inquisitive nature, snake bites or rodenticide are more likely.
Very young: Congenital should be considered, although they can be just as inquisitive.
Older patients: Tend to behave themselves and therefore are more likely to get acquired diseases.
Doberman: Prone to primary platelet factor disease, Von Willebrands.
Devon Rex: Prone to secondary coagulation disease
Greyhounds: Excessive breakdown of formed clots, fibrinolysis syndrome.
You may already have a likely diagnosis in your mind, or have a narrowed differential list just from these history questions and considering the signalment.